Tuesday, December 28, 2010

Roasted Butternut Squash with Latin Spice Mix

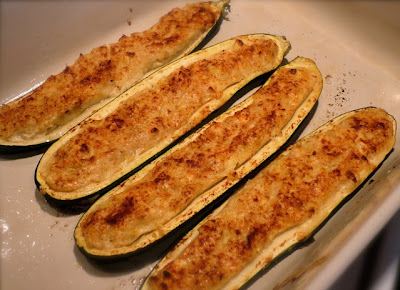
This recipe hails from my Aunt Judy, and I'm not really sure where she found it but it's a total keeper. We ate this as a side to our black bean, corn and cheese blue masa tamales on Christmas Eve. Soooo good! I already have plans for using more of the spice mix on sweet potatoes roasted in the same fashion. I only mixed up 1/2 a batch of the spice mix, but next time I'd go ahead and make it all. Pretty sure it'd be great on most any roasted veggie. Cauliflower comes to mind as my next victim after the sweet potatoes. :-)

Roasted Butternut Squash with Latin Spice Mix:
(via Judy Deggeller)

Latin Spice Mix
1/4 cup whole cumin seeds
3 Tbs whole black peppercorns
1 Tbs whole coriander seeds
2 Tbs sugar (I used raw sugar and it worked just fine)
1 1/2 tsp sea salt

Combine cumin, peppercorns, and coriander.
Stir in a skillet over medium heat for 8 minutes.
Cool slightly.
Smash in a baggie (this doesn't really work for me, so I put it in my spice grinder and just give it a couple pulses, til crushed looking).
Stir in sugar and salt, and store in a fresh bag or clean jar.

Squash
4 lb butternut squash- peeled, seeded and cut into 1 inch cubes
1/4-1/3 cup olive oil
1.5-2 Tbs Latin Spice Mix
1/4 tsp cayenne (I didn't realize that I'd left this out until just now!...didn't miss it at all, was good and spicy without it)

Preheat oven to 400.
Toss squash in a bowl with olive oil and spice mix.
Bake on a large baking sheet, stirring occasionally for 45-60 minutes.
I added some large flake sea salt to the squash to finish since I thought it needed a bit more salt...maybe because I only used 1.5 Tbs of the spice mix.

Monday, December 27, 2010

Profiteroles au Chocolat

Part of me is really missing my West coast family this holiday season. I was able to soothe myself somewhat by preparing some of the dishes we've enjoyed together this Christmas Eve for my mom and my Monster. When I was growing up Christmas Eve was a night that, if I was with my dad, would have always been spent with my Muttie, Aunties, Uncles and great cousins, and it typically ended with profiteroles filled with vanilla ice cream and topped with a goodly amount of love-filled chocolate sauce. Mmmm.
All I can say is that it's been too, too long since I've gotten to spend that special night with all those wonderful people but, making this dessert helped to take me back...just enough.

The recipe is in my copy of our family cookbook, put together 20 years ago by my step-monster.
Many thanks to her for doing so, as I still go to it for comfort from time to time.
Maybe it's time for me to start working on a new edition for Christmas next year? It would be wonderful to see how our collective "favorites" have changed over the years.
I put my own little spin on the chocolate sauce this year, since we were having tamales for dinner. A touch of cinnamon and a little almond extract in the sauce made it really special and just a little south of the border.

The profiteroles can be made ahead and frozen in a freezer Ziplock bag for up to a month.
I made the chocolate sauce right before serving, but I think it could be stored in a wide-mouth jar in the freezer and spooned out at will. Will have to test this theory. :-)

Profiteroles au Chocolat:
(Butler Family Cookbook; compiled by Antoinette Butler 1991)

Profiteroles
1/2 cup flour
1/4 cup (4TB) butter
1/2 boiling water
2 large eggs

Preheat oven to 425.
Heat water to boiling in a heavy saucepan (I used a 3 quart pot).
Add butter, stir to melt.
Reduce heat and add flour all at once, stirring rapidly with a wooden spoon until incorporated.
Remove from heat.
Add eggs one at a time, beating well after each.
Beat the mixture until it's satiny and breaks off when spoon is raised.
Drop mixture from a teaspoon onto an ungreased cookie sheet in about 1 inch mounds (I used my Air Bake insulated non-stick cookie sheets with great success, I think parchment paper would be a good idea if you don't have these, but don't use butter or spray as it will interfere with the rise of your cream puffs).
Bake ~20 minutes until golden brown.
Cool them completely on a baking rack.
At this point you can either serve them by cutting off the tops and filling them with vanilla ice cream and topping with warmed chocolate sauce, or you can freeze them.
If freezing, place them in a large Ziplock freezer bag and place the bag flat on a cookie sheet that will fit in your freezer. Once frozen you can take the sheet out from under them.
To serve from freezer, place them on a baking sheet in a 350 oven for about 8-10 minutes to crisp them up again.

Chocolate Sauce
3 oz unsweetened chocolate
5 Tb butter (I had unsalted, but I added a pinch of fine sea salt to the mix)
3 cups sifted confectioners sugar
1 cup undiluted evaporated milk (not sweetened condensed)

Melt chocolate and butter in a saucepan (make sure you use a large enough pan that your sauce won't boil over. I made 1.5x this recipe and had to change pots midway!)
Remove from heat.
Add sifted confectioners sugar alternately with the evaporated milk; blending well after each addition.
Return to heat and bring to a boil over medium heat stirring constantly.
Cook and stir until mixture becomes thick and creamy, about 8 minutes. Remove from heat and stir in vanilla (and if you want to do what I did, ~1/2 tsp ground cinnamon and a small amount ~1/8-1/4 tsp? almond extract).
Serve warm.

Wednesday, December 22, 2010

And Now Back to Our Regularly Scheduled Holiday Crap: Chewy Chocolate Coconut Macaroons

I've been really good lately in the avoidance-of-too-many-treats department. Got back on track for a good couple weeks after Thanksgiving. Alas, when one has a dinner party to go to...what is one to do?? Bring gnarly desserts of course! I like to tell myself that it's the LEAST I can do. ;-)
All of these suckers are getting left behind after we walk out the door.
These puppies are in the oven right now and I'll I can say is it's a good thing my Pop isn't here to smell them baking. They'd never get a chance to cool down before he wolfed 'em all up!
I used 2 baking sheets placed on 2 different racks to cook as many as possible in one go. But, I think they'd have fared much better all cooking on the same rack. When I baked a third sheet to use up the batter, the finished macaroon looked more like the Cooking Light photo, having spread a bit more than the first ones that went in.

The Verdict:
I could have eaten the whole bowl of batter before cooking these. The end result after baking, good, but not completely swoon worthy. I'll bet if I added some booze (rum? creme de cacao?) that would do the trick!
Oh and that dinner party got cancelled, but I got to leave most of these with my skinny friends anyway...whew! :-)

Chewy Chocolate-Coconut Macaroons:
(Cooking Light) recipe makes about 3 dozen

2 ounces unsweetened chocolate, chopped
1/2 cup sifted cake flour (I subbed 7 Tbs unbleached flour + 1 Tbs cornstarch and I might use a bit less flour if I make these again)
2 tablespoons unsweetened cocoa
1/8 teaspoon salt
2 1/2 cups lightly packed flaked sweetened coconut
1 teaspoon vanilla extract (I'd try adding the same amount of a complimentary liquor next time too)
1 (14-ounce) can fat-free sweetened condensed milk (couldn't find the fat-free stuff)

Preheat oven to 250º.

Line a large baking sheet with parchment paper, and secure with masking tape.

Place unsweetened chocolate in a medium sized microwave-safe bowl. Microwave at high for 1 minute or until almost melted. Remove from microwave; stir until chocolate is completely melted. Mix in sweetened condensed milk and vanilla, stirring to combine.

Spoon flour into a dry measuring cup; level with a knife. Combine cake flour, unsweetened cocoa, and salt in a large bowl. Add coconut, and toss well.

Stir melted chocolate mixture into the coconut mixture (the mixture will be stiff).

Drop by level tablespoons 2 inches apart (I think you could put them closer together more like an inch apart) onto prepared baking sheet. Using a 1 Tb cookie scoop makes this go so much more easily). Bake at 250º for 45 minutes or until edges of cookies are firm and center of cookies are soft, rotating baking sheet once during baking time. Remove from oven, and cool 10 minutes on pan on a wire rack. Remove the cookies from the parchment paper, and cool completely on rack. Store in an airtight container.

(If you manage to find the fat-free sweetened condensed milk each cookie will be ~84 calories)

Tuesday, December 21, 2010

Roasted Mushrooms with Garlic,Thyme and Balsamic Vinegar

Ok, this completely breaks Monster's "No Mushies EVER Law". But, I'm ok with that. It took me a long time to come to the realization that I could prepare stuff he didn't like at home for MYSELF.
It started with eggplant...pan roasting it with thyme til soft and delicious, then sprinkled with lemon juice. They could be eaten at my leisure, for a quick nosh during the day, reheated as a side that just didn't show up on his plate, etc.
Now, enter the mushroom. I'm really partial to portabellas. I always order them when we're in a restaurant since I don't cook mushrooms at home. Make that DIDN'T. The other day at Costco, I succumbed to a large 24oz. package of "baby bellas", ie. criminis. Not one to start out small like...
With just shy of a pounds worth, I made up a batch of vegetarian soup in the pressure cooker using sliced criminis, whole spelt and a nice touch of sherry. House smelled wonderful. Best thing of all, I just froze what I didn't eat for dinner. Money in the bank. That left me with about 10 oz of mushrooms. Enter Kalyn's Kitchen's recipe for roasted mushies. So simple, so good, and divine eaten alongside my French green lentils and leeks for lunch.
And so, I must encourage those out there that may have a partner/spouse that doesn't like something they do to say "So what!". And make it anyway. :-)

Roasted Mushrooms with Garlic, Thyme, and Balsamic Vinegar:
(Makes 4 side-dish servings, recipe found at Kalyn's Kitchen adapted slightly from Vegetables Every Day by Jack Bishop.)

1 lb. mushrooms (I used brown Crimini mushrooms)
2 T + 1 tsp. olive oil
salt and fresh ground black pepper to taste
1 T finely minced garlic
1 T balsamic vinegar
2 T finely chopped fresh thyme leaves
1 T chopped fresh parsley (optional, for garnish)

Preheat oven to 400F/200C. Wash and dry mushrooms. Pull out stems and cut them in half.
Cut the caps into halves (or quarters if the mushrooms are large, which I did.)
Put mushrooms into bowl and toss with 2 T olive oil, salt, and fresh ground black pepper.
Give a baking sheet a quick spray of canola cooking spray (or a light coating of olive oil) then arrange mushrooms on the pan in a single layer. Spread them out as much as you can.

Roast mushrooms 15 minutes. While mushrooms cook, finely chop fresh thyme, then mix with minced garlic, balsamic vinegar, and the tsp. of olive oil.

After 15 minutes, drain off any liquid that has accumulated (this wasn't necessary with mine). Then toss the hot mushrooms into the bowl with garlic-thyme mixture.
Arrange back on roasting pan and cook about 10 minutes more. Serve hot, sprinkled with chopped fresh parsley if desired.

Sunday, December 19, 2010

Eggless Salad Sammies

I was on my own the other night, so thought I'd whip up some eggless salad for a quick dinner sammie. I used The Happy Herbivore's recipe, following exactly as written this time. Next time I'd go ahead and add seasonings more slowly and just to my taste. Oh wait, one small change I made was in adding a couple dashes of Tabasco sauce. Because that's just how I roll.
The Monster and I enjoyed the rest for lunch the next day on a nice soft alternative grains bakery loaf and it was really great. Personally, I think a softer bread is the way to go with egg salad, be it eggless or eggy. The sprouted rye I ate it on originally was good, but not quite the same.

Eggless Salad:
(The Happy Herbivore)

12 ounces extra-firm tofu
1 Tbs low sodium soy sauce
1 whole celery stalk, minced
1¼ Tbs nutritional yeast (not the same stuff you'd use for baking for goodness sake :-)
1½ Tbs Dijon mustard
2 Tbs relish
½ tsp turmeric
¼ tsp mild curry powder
¼ tsp garlic powder
¼ tsp onion powder
½ tsp black salt (add salt judiciously to taste since there's already low sodium soy in this…oh and I just used sea salt)
2 Tbs vegan mayo (I use Spectrum brand lite vegan mayo)

If using firm tofu, press for at least 20 minutes. Give exrta-firm tofu a good squeeze before starting. Crumble tofu into a large mixing bowl. Add remaining ingredients and stir until well combined. Let set for a few minutes (this allows the flavor to merge but also enhances the yellow coloring). Stir again. Taste, adjusting spices as necessary. Add black pepper to taste and serve.


Saturday, December 18, 2010

Mediterranean Style Spaghetti Squash

This was so unbelievably good. Even though I left out the olives! Didn't realize that I did until just now when I warmed some up for "second breakfast". :-)
As far I was was concerned, the sketti squash was the star and the chicken we ate with it could have all gone on the Monster's plate. This is super easy and you can toss in whatever veggies you'd like really. I think I'd planned on putting some shredded zucchini in, but ended up doing a quick saute on some spinach with the tomatoes. The original recipe was found on All Recipes and it's gonna be a keeper.

Mediterranean Style Spaghetti Squash:

1 spaghetti squash
~2 Tbs olive oil
1 onion (I didn't have the recipe in front of me and used 1/2 a red onion), chopped
1-2 cloves of garlic, minced
~12 cherry tomatoes, halved or equivalent of ripe tomato, chopped
baby spinach, coarsely chopped (I grabbed about 3 big handfuls, then chopped)
crumbled feta (original calls for 3/4 cup, but I know I used less than that)
~2 Tbs fresh basil, chopped
~3 Tbs black olives (I guess I'd planned on putting Kalamatas in, but blew that...great without)
salt and pepper

Heat oven to 375.
In a 9x13 baking dish, place squash halves cut-side down.
Fill dish with ~1/2 inch of water, cover with foil and bake for about 40-45 minutes.
Turn squash cut side up test for doneness with a knife, if not done continue cooking cut side up for ~10+ more minutes. You don't want this to be underdone, but if it's overdone it won't scrape into "noodles" when you scrape out the flesh with the tines of a fork.
When done, set aside until it's cool enough to handle. I prepared everything else, while this was cooling a bit.
Heat the oil in a skillet over med-high heat.
Saute onions with a touch of salt until soft, 8-10 min., then add garlic and saute just until fragrant, about a minute.
Add chopped tomatoes or halved cherry tomatoes and chopped spinach and cook only about 2-3 minutes more.
Remove from heat and place in a large bowl.
Add feta, basil and olives.
Drag a fork gently through the squash, teasing forth the strands of "noodly" goodness.
Add squash to tomato mixture and toss with salt and pepper to taste.

Thursday, December 16, 2010

Salade sans Niçoises

Well, YOU can feel free to use real Niçoise olives in this meal, but I just happen to like Kalamatas better and have made a substitution. Hence my title…Salad Without Niçoises.

When I was a kid, my dad must have made a Salade Niçoise for dinner at least a couple times per month, hollering "à table!" to call the troops to the dining room. Always a favorite, I can't believe it's been so long since I've made one. This is a nice salad to throw together on a weeknight using canned tuna, or if you're feeling fancy you can buy sushi grade tuna steaks and do a quick sear on them. As written, my recipe makes enough for 2 large dinner portions.

Salade sans Niçoises:

2 Tbs red wine vinegar
1/2 tsp dijon mustard
1/2 tsp fresh minced tarragon
1/4 tsp salt
1/4 tsp black pepper
a touch of agave nectar if you'd like
~1 Tbs olive oil

1 6oz can of tuna, drained
2 hardboiled eggs (start eggs in cold water, when it comes to a boil, cover pot, turn off flame and let sit for 11 min…you won't get grey rings around your yolks)
~1/2 lb green beans
a couple of smallish Yukon gold potatoes
as many Kalamata olives as you'd like…or if you must, Niçoise. ;-)
salad greens, enough for 2 salads (I used Romaine this time)
optional: thinly sliced red onions are always nice if you like 'em...Monster, not a fan of the raw onion.

Mix red wine vinegar through olive oil to make your dressing.
Bring a pot of water to the boil and cook green beans until crisp tender, remove with a slotted spoon and set aside.Add potatoes to boiling water and cook for 8-10 minutes, or until they are easily pierced with a fork.I like to place the greens on the plate and toss with a little dressing first.
Then add the green beans to the dressing bowl and toss to coat. Add that to the center of your greens. Then same goes for the potatoes…roll in dressing bowl then arrange on the greens. Add the tuna, eggs, and olives to your salad and add any extra dressing to the top of those. Add a few more drops of olive oil on top if you care to.

Monday, December 13, 2010

Vegan Gingerbread French Toast

I was searching for recipes the other day for something that might be suitable to make for a quickie Christmas morning breakfast. Something that felt holiday-y, but wasn't just awash with empty calories.
We gave this recipe from the Happy Herbavore a dry run on Sunday and although it felt like a treat, it didn't leave us feeling heavy for the rest of the day. I've never loved the egginess of typical French toast. Must be the sweet-eggy combo I don't like. Vegan recipe to the rescue!
Give it a try. Specially if you're out of eggs. :-) I might try it with an artisan whole grain boule next time. (update: Had this again Christmas morning and it was so nice with made with aforementioned crusty whole-grain boule...let it soak up the batter well and it'll be wonderful)

On another note...jeez, I'd better get back in the habit of posting my kitchen adventures before I forget 'em. I made a super simple dish the other night that I'm calling Swiss Chard Nabe (nah-beh). Probably completely misnamed, but I had a bowl of comfort from a Japanese fusion restaurant in Austin that they called Take Nabe...made my toes curl from the goodness. A bowl of sushi rice, topped with enoki mushrooms, a gooey egg, lemon zest, and dancing, prancing bonito flakes. Ohmydog. So good.
I WILL be making my at home version from last night again soon and must write up the oh-so- simple "recipe". Did I take a picture last night? Of course not.

And so...

Vegan Gingerbread French Toast:
(The Happy Herbavore)

8 whole wheat bread slices (we used 6 slices)
1 cup unsweetened plain soy milk
¼ cup pure maple syrup
¼ cup chickpea flour (I'll pass through fine mesh sieve first next time since mine seemed courser than normal and a lot of it sank to the bottom of the batter bowl and didn't stick...oh and look for this in an Indian grocery store [or Fiesta in Texas] under the name Besan Flour)
1 tsp cinnamon
1 tsp ground ginger
½ tsp fresh ground nutmeg
¼ tsp cloves (I used less)

Heat griddle to 350 (or heat a regular pan over med-high heat after you've mixed your batter).

Whisk all ingredients (except bread) together and pour into a shallow dish.

Soak bread slices in the milk mixture and then transfer to the heated, oiled/Earth Balanced griddle. Cook each side for about two minutes or until slightly brown and crisp.

Great topped with chopped crystalized ginger, pecans and Greek yogurt (decidedly NOT vegan).

Wednesday, November 17, 2010

Spaghetti Squash Casserole

I had a spaghetti squash sitting on my counter that was in need of some love the other day. This is what resulted. Ate as a side for baked wild salmon one night and by itself with brown rice the next night. Goot and will make again.
Took much less time to put together since I'd roasted the squash and scooped it the day before when I had the time. I'm guessing this would be ok to make ahead of time and just bake it the day you'll be eating it...maybe add the bread crumbs right before baking though (and it would take longer to come to point of being bubbly when baking).

Spaghetti Squash Casserole:

1 spaghetti squash, halved lengthwise
1 tablespoon vegetable oil
1 small onion, chopped
2 cloves garlic, minced
~2 Tbs fresh chopped basil, or teaspoon dried basil
2 plum tomatoes, chopped or equivalent in cherry tomatoes
1 cup low fat cottage cheese
1/2 cup mozzarella cheese
1/4 cup chopped parsley
1/4 teaspoon salt or to taste
1/4 cup grated Parmesan cheese
3 tablespoons seasoned bread crumbs (I used whole wheat crumbs that I added Italian seasoning and garlic powder to)
Optional: I had some fresh spinach to use up, so I wilted the wet leaves in a skillet for a few minutes, squeezed out the water then chopped and added to the vegetable mix

Preheat the oven to 375 degrees F.

Using a sharp knife, cut the squash in half lengthwise and place, cut side down, in a baking dish. Add enough water to come 1/2-inch up the sides of the baking dish and cover with aluminum foil.Bake for 45 minutes, until the squash is easily pierced with a paring knife. Turn squash over and cover with foil again and continue to cook another 10-15 minutes, until the squash is tender. Remove from the oven, uncover, and allow to cool slightly. Using a spoon, remove the seeds and discard. Using a fork, gently pull the strands of squash away from the peel and place the squash strands into a mixing bowl.

Just want to mention that my squashes always seem to take different times to cook. Check after 45...it might surprise you and be done.

Raise oven temp to 400.

Meanwhile, warm the oil in a medium skillet set over medium heat.
Add the onion, garlic and basil.
Cook for 4-5 minutes or until the onion is soft.
Add the tomatoes.
Cook for 3 to 4 minutes, or until the mixture is dry.
Add spinach if using.
To the bowl with the squash, add the cottage cheese, mozzarella, parsley, salt and the onion mixture.
Stir well to mix all ingredients.
Spray a 9x13 baking dish with cooking spray.
Pour mixture into prepared dish.
Sprinkle with the Parmesan cheese and bread crumbs.
Bake for 30 minutes or until bubbly and heated through.

Sunday, November 14, 2010

Cranberry Orange Cornmeal Scones

Oh goodness. Well, some day I'll have to try to make these again with the amount of butter called for in the recipe.
2 extra Tbs. went into ours this morning! I'm not complaining about my mistake...too loudly. Seeing as they were so delicious and all. Probably wouldn't have spread quite so much with less butter, but man were they tender.
I went looking for a cornmeal scone recipe online the other day, since we'd enjoyed some really amazing ones from a bakery in Portland, OR. over the summer.
These weren't quite the same, but they sure were good! And, now I have the perfect excuse to make them again...the RIGHT way.

Cranberry Orange Cornmeal Scones:

1 cup unbleached flour
1/2 cup stone ground whole grain cornmeal (I used a combo of fine and medium Bob's Redmill)
1/3 cup granulated sugar (I used turbinado raw sugar)
1 1/2 tsp baking powder
1/4 tsp baking soda
1/4 tsp salt
6 Tbs cold butter
3/4 cup dried cranberries
1/3 cup chopped pecans (I used toasted walnuts)
2 tsp orange zest
1/2 cup buttermilk
1 Tbs orange juice
more turbinado sugar to sprinkle on top

Heat oven to 400°. Lightly grease and flour a scone pan or baking sheet.
In a food processor or large bowl, combine the flour, cornmeal, 1/3 cup sugar, baking powder, soda, and salt. If using the food processor, pulse a few times to combine.
Cut butter into pieces and add to the dry ingredients. Pulse until the mixture is like a coarse meal. Alternately, this can be done by cutting the butter into the dry ingredients with a pastry blender.
If using the processor, transfer the meal-like mixture to a large bowl.
Stir in dried cranberries, chopped pecans, and orange zest.
With a fork, mix in buttermilk just until dry ingredients are moistened.
With floured fingers, pat into a greased and floured 6-wedge scone pan or pat into a round on a lightly floured surface and cut into 6 even wedges; place on a greased baking sheet (I just used an ungreased air-bake cookie sheet).
With fingers or a pastry brush, brush with orange juice just to moisten tops. Sprinkle with sugar.
Bake for about 15 minutes, or until golden brown.

Thursday, October 28, 2010

Chocolate Sweet Potato Torte

This is such a lovely cake...well, maybe lovely isn't the word as it doesn't seem much to look at, but it tastes wonderful. I reduced the amount of sugar by a quarter cup both times I made this as my sweet potatoes were plenty sweet. Folks I served it to had no idea it was a "healthier" cake until I told them. No butter, no oil, and as it happens no flour if you're looking for a recipe that is gluten-free (make sure you use gluten-free chocolate if that's what you're going for).

Chocolate Sweet Potato Torte:
(Vegetarian Times Magazine)
Serves 12

1 1/4 cups sugar, divided (original recipe calls for 1 1/2...1 being added to the sweet potato cocoa mix, the other 1/2 to the egg whites. I used evaporated cane juice crystals.)
1 cup packed cooked, mashed orange-fleshed sweet potato, such as Beauregard, garnet, or jewel (I roasted them wrapped in foil at 400 for about an hour, till soft, then peeled once cool)
1 cup almond flour
1/2 cup unsweetened dark-chocolate cocoa powder
1/8 tsp. salt
4 large eggs
2 oz. bittersweet chocolate
2 Tbs. milk, or any plant "milk" you prefer

Preheat oven to 375°F. Coat 9-inch springform pan with cooking spray.
Blend sweet potato, 3/4 cup sugar, almond flour, cocoa, and salt in food processor 30 seconds, or until smooth, scraping bowl as necessary.
Separate 3 eggs, placing whites in bowl of electric mixer. Add 3 yolks and remaining whole egg to sweet potato mixture; pulse to combine. Transfer sweet potato mixture to large bowl.
Beat egg whites with electric mixer at high speed until soft peaks form. Add remaining 1/2 cup sugar; beat 2 minutes more, or until stiff, glossy peaks form.
Fold one-third egg white mixture into sweet potato mixture with spatula. Gently fold in remaining whites. Pour batter into prepared pan. Bake 35-45 minutes, or until toothpick inserted in center comes out clean (mine was done at 40 min). Cool 10 minutes in pan on wire rack. Remove springform sides; cool completely.
Melt chocolate in small saucepan over medium-low heat. Stir in soymilk. Alternately, you can just put both chocolate and soymilk in a bowl in the microwave for ~15-20 seconds taking care not to burn the chocolate. Spread chocolate mixture over top of cake. Let stand until chocolate sets.

Per slice: Calories: 227, Protein: 6g, Total fat: 9g, Saturated fat: 2g, Carbs: 37g, Cholesterol: 71mg, Sodium: 61mg, Fiber: 3g, Sugars: 29g

Monday, October 25, 2010

Pumpkin Hotcakes

Nothing says Fall like punkin' anything. I've been thinking about cooking with it for weeks now and finally got around to doing so this weekend. I'm sure the fact that EVERY food blog I've read lately has featured pumpkin recipes has had nothing to do with my thought processes. :-)
Thankfully, I was too lazy to get out of bed Saturday night when I remembered I hadn't soaked the oats in buttermilk for for our standard Oatmeal Pancakes and had to search for something new to try out. Pinch My Salt had just the homey recipe I was looking for.
I'd just bought a new bag of white whole wheat flour so decided I'd sub that for both the regular whole wheat and cake flour she used in her pancakes. They were a resounding success...yums all 'round. The recipe made 12 pancakes for us. We each ate 4 (plus 1/2 ea. of the "test meatball"...you know, the one meatball/pancake you have to try to see if it's done?), but I should have stopped at 3 max. Very filling! I'll be making these babies again for sure.

Pumpkin Hotcakes:
(Adapted only slightly from Pinch My Salt's blog)

1 1/2 cups white whole wheat flour
1 tsp baking soda
2 tsp baking powder
1/4 tsp salt
1 tsp ground cinnamon
1/2 tsp ground ginger
1/2 tsp ground nutmeg (I used about 1/4 tsp fresh ground)
1 cup+ buttermilk (you'll likely need more than 1 cup of buttermilk and you'll still have a thick batter)
1 cup canned pumpkin puree (not pumpkin pie filling)
2 eggs, lightly beaten
2 Tbs oil
1 tsp vanilla
2 Tbs dark brown sugar (I used 1 Tbs mild flavor molasses and 1 Tbs Sucanat)

Heat a pancake griddle to 325.
In a bowl, whisk together white whole wheat (Pinch My Salt uses 1 cup regular whole wheat and 1/2 cup cake flour) through nutmeg.
In another bowl, combine buttermilk through dark brown sugar, stirring to combine.
Add wet ingredients to your dry ingredients bowl stirring until just combined. Some lumps are fine. My batter was waaaaaay thick at this point so I added some more buttermilk.

Drop by 1/4 cupfuls onto your griddle, flipping the pancakes when the sides have started to dry out. Then cook the other side for several more minutes. Our pancakes were really thick, so make sure you give them enough time on the griddle to cook all the way through.
Place pancakes in oven at low temp to keep warm until all are finished.

Serve with whatever toppings you generally like on your hotcakes. I went for walnuts, pure maple syrup and some Greek yogurt dolloped on each. YUM.

Wednesday, October 20, 2010

Acorn Squash Toad-in-the-Holes

I loved this idea when I came across it on Proud Italian Cook's blog. Now, after making these newfangled toad-in-the-holes last night, I like the idea even more!
I went a different route with the spices on ours, choosing instead to blend whole corriander, whole cumin, chunky grey salt and whole peppercorns to a course grind in my spice mill (read: coffee grinder that has never seen coffee). We ate these with braised collards for dinner, but they'd make a great dish for brunch as Proud Italian Cook suggested.

Acorn Squash Toad-in-the-Holes:
(adapted from Proud Italian Cook's recipe)

1 large washed acorn squash (you can eat the skin)
olive oil
~1 tsp whole corriander
~1 tsp whole cumin
~1/2 tsp whole black pepper corns
~1/2 tsp grey salt
eggs
Optional:
grated Pecorino Romano
parsley to garnish

Preheat oven to 400.
Course grind corriander, cumin, black pepper and grey salt, then set aside.
Slice an acorn squash into rings (yeah, try getting them all the same thickness...impossible!) withOUT cutting any extraneous bits off your hands (wait a minute...wouldn't "extraneous" suggest that you've got extra bits that you could afford to lop off? Hm, better make that "without cutting ANY bits off your hands" full stop).

Lightly coat squash rings with olive oil, sprinkle as much spice as you'd like on each side of rings.

Bake for ~20-25 minutes at 400, or until tender (the preceding can be done ahead of time if need be...which I did, and then reheated the rings in the microwave for 1 minute before starting the next step).

Move oven rack to top of oven and pre-heat the broiler on High.
Heat a non-stick pan (that can go into the oven) with a little olive oil on med-high.
Place squash rings in pan, crack eggs into the centers (add salt and pepper to eggs), then once the eggs have set on the bottom, about a minute, transfer to the broiler and cook until tops set. Try to cook the eggs so the white is done, but the yolks remain liquid.
Remove from oven, sprinkle lightly with Pecorino Romano and parsley, and serve immediately.

Monday, October 18, 2010

Brutti Ma Buoni Cookies

I was baking with my friends today...the requisite Ogre Toe cookies for Halloween, but I wanted to squeeze these into the day's baking frenzy too.
I've wanted to make these gnarly dudes since I copied the recipe from a copy of Food and Wine on a recent visit to my grandmothers, but felt I needed a place to leave most of them given my propensity towards eating entire batches of sweets all by my wee self. Today seemed the perfect occasion to make them (although I still brought more home than I should have).
The name Brutti Ma Buoni is Italian for "ugly but good". Now who couldn't fall in love with something of that name? Like the homeliest sweet mutt at the pound, I can't see how you wouldn't fall hard and fast for these cookies. Who needs a frou-frou, fawned over iced sugar cookie? Give me brutti ma buoni any day over cute. I'd also venture to say the name should be upgraded to Ugly But Great!

Brutti Ma Buoni (ugly but good):
(Food and Wine Magazine)

1 1/2 cups hazelnuts (8oz)
1 1/2 cups confectioners sugar
pinch of salt
1 large egg white, lightly beaten
2 tsp vanilla

Preheat oven to 375.
Roast hazelnuts for ~12 minutes til fragrant and skins blister. Watch carefully as they'll burn...in fact, the original recipe called for roasting at 400 which I had bad luck with.
Transfer to a kitchen towel, cool, and rub the skins off as best you can.

Process nuts, sugar and salt til finely chopped.
Scrape into a medium bowl and stir in egg and vanilla.

Bump the oven temp to 400.
Line baking sheet with parchment.
Spoon Tbs.-sized mounds of hazelnut dough onto the prepped sheet one inch apart.
Bake cookies in center of oven for 14 minutes, until browned in spots (about 13 minutes for chewy cookies and 15 for slightly crisp).
Let cookies cool on the sheet before serving.

Can be stored in an air-tight container for 4 days...yeah, like they'd last that long. ;-)

Friday, October 15, 2010

Chocolate Mint-Chip Cookies

Don't ask yourself if you should, just make these cookies already!

Chocolate Chip-Mint Cookies:
(Mollie Katzen's Still Life with Menu)

3/4 cup (1.5 sticks) room temperature unsalted butter
1/2 cup (packed) brown sugar
1/2 cup granulated sugar
1 large egg
1 tsp vanilla extract
1 tsp peppermint extract
1 1/2 cups unbleached white flour (I used white whole wheat flour with good results)
1/4 Dutched unsweetened cocoa
1 tsp baking soda
1/4 tsp salt
1 cup chocolate chips (I used white chocolate chips)

Pre-heat oven to 350.
Lightly grease a cookie sheet (not necessary with air bake non-stick pans of course)
Cream together butter and sugars with an electric mixer on high.
Beat in the egg.
Stir in the vanilla and peppermint extracts.
Sift together the dry ingredients, and add this to the butter mixture along with the chocolate chips. Stir until well combined.
Drop by rounded teaspoons (know that I didn't want to muck around in the kitchen for too long making these so I pretty much doubled the size of the cookies, baking for about 16 minutes. I ended up with 18 cookies baked 9 per sheet, rather than 2 1/2 dozen) onto the cookie sheet.
Bake 12-15 minutes at 350.
Remove from sheet immediately after baking, and cool on a rack.
I like them a tad underdone when they come out, or they dry out a bit.

I can totally see making ice cream sammies with these bad boys.

Wednesday, October 13, 2010

Slow Oven Roasted Tomatoes


Just look at those wrinkly beauties! Delicious, and all you need is time.

Slow Oven Roasted Tomatoes:
(inspired by Aunt Susan and her burgeoning vegetable garden)

I started with 2 lbs of Campari tomatoes (they were about 1.5" inches in diameter), then proceeded to cut them in half, seed, then toss in a little olive oil. I laid them out on a sheet of parchment, salted them with big flaky Maldon sea salt, put them in the oven at 200 for oh...bout 7-8 hrs. That's all there was to it. Might want to use more tomatoes if you do this since they shrink so much.
Now use them on sammies, pizza, in pasta, on salads, etc....yum.

Wednesday, October 6, 2010

Pizza with Zucchini, Slow-Roasted Tomatoes and Pesto

If you have these things, you must make pizza. It is the law of the land...

Slow oven roasted tomatoes
(I used Campari tomatoes that I seeded first, with just olive oil and sea salt roasted for hours and hours at 200 degrees...must have been 6+ hrs?...just keep going til they are utterly delicious)

A monster basil plant threatening to take over your backyard and hence, Basil-Almond Pesto
I only used 1-2 cloves of garlic though, for Pete's sake.

This recipe for Pizza Dough

It won't hurt your pie any if you broil 1/4" slices of zucchini and have slices of a big hunk of fresh mozzarella to pile on there too!

Monday, October 4, 2010

Cocoa Cream Cheese and Whipped Cream Frosting


This is just the most awesome frosting! I've made it several times without the cocoa as the original recipe was printed, but this time I had one gnarlsbad deep-sea angler fish to frost so I tossed 3 Tbs. of unsweetened Valrhona cocoa powder into the mix. I spose I should have taken step by step shots, but all my efforts went into creating the crazy cake that would be receiving the frosting.
You can pipe this quite nicely as I've done in the past, and it's nice and light due to the incorporated whipped cream. Yum, yum, yum! That said, when it came to eating the above cake, I'd already eaten waaaaaay too much frosting to even consider a slice without turning green. ;-)

Cocoa Cream Cheese and Whipped Cream Frosting:

1 1/2 cups well-chilled heavy whipping cream
1 8oz package of softened cream cheese (I used 1/3 less fat Philly)
1 cup granulated sugar (I used evap. cane juice crystals)
1 tsp vanilla
3 Tbs dark unsweetened cocoa powder

Chill the bowl and the beater of your mixer in the freezer till it's good and cold.
Whip the cream to firm peaks and set aside in the fridge.

In the bowl of your mixer, add softened cream cheese, sugar, vanilla, and cocoa powder. Mix on high until smooth and no longer grainy from the sugar.
Retrieve your whipped cream from the fridge and now carefully fold it into the cream cheese mix until blended.
Cover bowl with plastic wrap and return to the fridge until you're ready to use it...trust me and don't even TRY it, or you'll have a lot less for your cake!

Alternately, you can just make this a white frosting by leaving out the cocoa.

I'm pretty sure Daniel (the 6 year old recipient of the cake) is gonna NEED this t-shirt!

Thursday, September 30, 2010

Feta Stuffed Zucchini

I hadn't made these guys in a long while even though they are a particular favorite of the Monster. Mostly because they are a bit fussier than I like (I feel the same about stuffed tomatoes...what a pain). I mean, with the scooping of the zuke innards, the chopping and sauteeing of said innards, the cooling of the innards, then the stuffing of the zuke shells. C'mon, can't we just have sauteed zucchini and call it a day??
But, he does like them. And, I'd mistakenly bought a second container of feta when we already had a new one in the fridge....so.
They really are lovely though. :-)

Feta Stuffed Zucchini:

2 large zucchini (you might want to make more if you're going to the trouble and all...)
1 Tbs butter
1 large shallot, minced
2 cloves garlic, minced
1 egg
1 1/2 Tbs flour (I used brown rice flour and I think I'll reduce this amt. next time since the stuffing kind of pulled away from the shell)
2 oz. crumbled feta
dash of salt and pepper to taste
paprika

Preheat oven to 350. Lightly grease an ovenproof dish.
Cut the zukes lengthwise, then scoop out the insides, leaving about 1/4" shell.
Save the zuke scoopings and chop them.
Melt the butter in a skillet, add the chopped zucchini scoopings, shallot, garlic and salt and saute until soft.
Let the mixture cool a bit, so you don't cook the egg in the next step.
In a small bowl, beat the egg lightly.
Stir in flour, feta, and cooked zuke/shallot mixture and little black pepper.
I like to sprinkle a little salt inside the zuke shells then fill them with your mixture.
Sprinkle tops of filled zucchini with paprika.
Bake for about 40-45 minutes, then pop them under the broiler for a few minutes.

Sunday, September 26, 2010

Spinach and Rice Casserole

Lovely comfort food that's not too unhealthy...I'll definitely be making this casserole as a Turkey Day side dish. Great, quick-to-put-together weeknight dish that can be a vegetarian meal in and of itself, or as we served it, with chicken sausages and some sliced tomatoes. This is another casserole that hails from Mollie Katzen's Moosewood Cookbook...a book I've been happily rediscovering of late.
We had brown rice already cooked and in the freezer which made putting this together a snap, but because of that I don't have a firm amount on the rice I used. I think using the recipe as written might end up using a higher ratio of rice to spinach? But heck, it IS a casserole. Just use what looks good to you! :-)
I halved the recipe the recipe as printed in the book because we were eating it as a side dish last night. Had plenty for a nice lunch the next day too. I'm writing up the halved version, so just double and use a 9x13 in. pan if you want more.

Spinach and Rice Casserole:
(Moosewood Cookbook; Mollie Katzen)

1 cup uncooked brown rice (I used a combo of brown and a little red)
1 Tbs olive oil
1 cup onion, chopped
3 cloves garlic, chopped
1 lb fresh spinach, finely chopped (I screwed up and cooked it first, then chopped, but I think that was a less messy way to do it in the end)
1/2 tsp Kosher salt, or to taste
1/4 cup raw sunflower seeds, divided (I questioned the use of these, but they really added a great texture! They also up the protein content if this is your whole meal)
1/8 tsp nutmeg
1/8 tsp cayenne
fresh black pepper to taste
1/2 cup low-fat milk (I used unsweetened soymilk)
1 egg, beaten
3/4 cup grated cheese (I used Cave-aged Gruyere, but recipe suggests cheddar)
paprika
Optional: we enjoyed topping our servings with Cholula hot sauce. :-)

Cook brown rice as per package instructions.
Preheat oven to 350 and butter a 1 quart casserole (I think!...I just used what looked like half of a 9x13).
Heat oil in a deep skillet (I used a Dutch oven) on med-high heat.
Saute onion for about 5-8 minutes until soft; add garlic, spinach and salt and cook about 5 minutes more over medium heat, stirring frequently.
Add to the rice, along with nutmeg, cayenne, black pepper and half (2 TBS) of the sunflower seeds.
Beat together egg and milk and add to the spinach-rice mixture.
Add in cheese and transfer to your buttered casserole dish.
Sprinkle with remaining sunflower seeds and dust with sweet paprika.
Bake uncovered for ~35 minutes, or until heated through and lightly brown on top.

Tuesday, September 14, 2010

Rosemary Fig Confit

I made this once, years ago...but with figs all around me in the store figured it was about time for another batch. I add balsamic to taste (probably ~2+Tbs) and a touch of sea salt as the figs simmer. I find it's awfully flat without those additions, but you can be the judge.
The original recipe is for using in sammies made with brie and prosciutto on ciabatta rolls, but I remember liking a wee sammie made with either melty Manchego cheese or Cave-aged Gruyere and just the confit much, much better. So that's how we'll be using this loverly goo tonight. Think I'll make mini panini with Kaltbach Gruyere and the confit as a nice side to soup for dinner.
Fyi...this is awesome stirred into Greek yogurt for breakie!

Rosemary Fig Confit:
(Gourmet, July 1995)

1 cup dried Calimyrna figs, chopped fine
1/2 cup dry white wine
1/2 cup water
3 Tbs honey
1 tsp chopped fresh rosemary
(add balsamic and sea salt to taste as figs simmer)

In a heavy saucepan stir together ingredients and simmer, covered, 20 minutes.
Remove lid and continue to simmer mixture, stirring occasionally, until most liquid is evaporated and mixture is thickened.

In a food processor coursely purée fig mixture.
Confit may be made 5 days ahead and chilled, covered.

Bring confit to room temp before using. Makes about 1 1/4 cups.

Tuesday, August 31, 2010

Chilaquile Casserole

I have to hurry and post this casserole while Hatch chile peppers are still in season!
I made this on Sunday and talk about comfort food. So good, quick and easy, and I just happened to have all the stuff to make it in the fridge! Gotta love that. I'd already made a salsa with a bunch of my roasted chile stash...it was living quite happily in the freezer, just waiting for a yummy recipe like this to go on top of. The best part about this casserole, is that you can really just put anything you think sounds good in it. My tortillas had been purchased to make enchies with and they'd broken in half by the time I'd gotten them home from the store! Those sad tortillas had been sitting in the fridge for at least a week without a purpose, destined for the dustbin. But! They were just perfect for this recipe...they came right back to life. I'll type up the basic recipe then tell you what else got added in.

I guess I'd better type up the salsa recipe too. Even though there's no photo to go with...
You can just buy salsa verde, but homemade is so easy, and always much better.

Chilaquile Casserole:
(Still Life with Menu Cookbook by Mollie Katzen)

12 uncooked corn tortillas
about 1/2-3/4 cup diced roasted Hatch chiles (I used a combo of hot and mild...you could also just use 2 cans of diced green chiles)
2-3 cups grated Jack cheese (I used a combo of sharp cheddar and jalapeno queso fresco)
4 eggs
2 cups lo-fat buttermilk
salsa verde (recipe follows)

Optional additions:
1-2 cups of pinto beans, drained
a touch of cumin
1 cup chopped onion, sauteed until soft
1-2 med. sized cloves garlic, sauteed
1 small diced zucchini, lightly sauteed

I used 1 can of cannellini beans, zucchini and garlic sauteed in a little butter and olive oil with a dash of cumin and a little salt.

Preheat oven to 375.
Butter or oil a 2-quart casserole or a 9x13 inch pan
Tear 6 tortillas into bite-sized pieces and place them evenly into the greased casserole.
Distribute the chiles, then half of the cheese. Now add your beans, zucchini and garlic (or anything extra you chose to put in) evenly over the cheese.
Tear the remaining tortillas and spread them on top.
Follow with remaining cheese.
Beat the buttermilk and eggs together and add salt and pepper to taste.
Slowly pour this custard over the casserole.
Bake uncovered for 35 minutes.
Serve hot, warm, or at room temperature.
Serve with salsa verde.

Hatch Salsa Verde:

5 roasted, skinned and seeded roasted Hatch chiles (I used 2 hot and 3 mild)
6 decent sized tomatillos, cut in quarters
1 clove of garlic
1/4 cup chopped cilanto
juice of 1/2 a lime
salt to taste

Whiz it all up in a blender. Done! :-)

Sunday, August 15, 2010

Zydeco Beans

The Monster usually packs a couple pepperoncini in his lunch every day, so I thought I'd try this recipe for pickled haricots verts from Coconut and Lime's blog as a little change up for him. Figure he must get tired of the same ol' same ol' so I try to come of up with little changes to his daily routine lunch so things don't get tooooo boring.

We cracked open a jar (I made 1/2 the recipe...3 jars) yesterday and they've been deemed worthy. The beans remain nice and crunchy and are dilly with a little spice from the red pepper flakes. I think it'd be fun to do a non-dill version with slices of jalapenos instead of the red pepper flakes sometime.

All in all, a fun experiment...that given better canning equipment (read: didn't have a big enough pot for more than 3 jars, and couldn't find my canning tongs), I'd repeat!

Thursday, August 12, 2010

Cashew Cream

I had some girlfriends over for lunch today (fish and chickpea burgers with tartar sauce...yum!), and one of them brought some gorgeous fruit for dessert. Better yet, she brought her Vitamix so that we could experiment making cashew cream to top the fruit with! This recipe is all over the internet in some form or another, but here it is again...cause it's sooo yummy! The recipe I used said that you could use a food processor to make this, just add 1/4 cup of water to start, then add the other 1/4 cup once stuff really gets good and moving. The Vitamix makes this a no-brainer. Just toss everything in and let'er rip.

Cashew Cream:

1 1/3 cups whole raw cashews; soaked then drained (preferably soaked overnight in the fridge covered with filtered water, but I had to speed things up by pouring boiling water over them and just leaving them on the counter from about 8am to 1pm)
1/2 cup water
2-3 Tbs agave nectar or 1-2 dates (our fruit was really sweet so I would add sweetener slowly next time...that said, it went over REALLY well with 3 TBS of agave ;-)
1/2 of a whole vanilla bean or 1 tsp vanilla extract
a squeeze of fresh lemon juice

Toss all the ingredients in a Vitamix or other high-powered blender and blend til nice and creamy. If making in a food processor, add 1/4 cup of water to start, then add 1/4 cup more after the ingredients have had a chance to come together, scraping down the sides frequently.

Should keep well covered in the fridge for several days.

Wednesday, August 11, 2010

Organization!

I finished this project over two weeks ago and it still makes me all wiggly every time I open a kitchen cupboard. Finally! All those wretched little bulk spice bags...gone! That and anything else I buy in bulk that's cupboard worthy (all those stinkin' bags full of different flours are still hiding shamefully at the back of our fridge). I spent 2+ days tossing old stuff, buying fresh stuff, procuring the necessary bottles and jars, filling said bottles and jars, and labeling. I tell you, all those little spice bottles are a sight to behold. The rest of our house may look like heck, but hey those cupboards are organized!

I didn't alphabetize the spices since there were over 50 of them...just tried to place them with spices they'd likely be used with, putting the ones I use often towards the front.
I can't tell you how nice it's been to be able to locate things quickly when cooking, rather than the usual shuffle through a pile of wee bags (most that would eventually develop small cuts and leak all over the place!). I love buying spices in the bulk section. You save a ton of money and don't end up with more than you can use before it expires.

The bottom shelf has always housed vinegars, some dry/wet condiments, hot sauces, etc., but no matter how often I put them in order, they'd squirrel their way out of that order all too quickly. Ok, lazy Susan? A concept it only took me a lifetime to wrap my brain around.

In another cupboard I've got all my baking requirements on the SAME shelf. What a concept! ;-)
Whole grains and legumes live above the baking shelf. Again, no more plastic bulk baggies piled one on top of the other.
On the top shelf lives cake decorating stuff and a few more lesser used items.
Cans live on the bottom shelf.

Lastly, we've got a long pantry with pull-out shelves by the fridge...All. Baggies. Gone!! :-)

I didn't write up this post to inspire you, nor did I compose it to gloat. I'm pretty sure I just wanted to be able to look at these cupboard innards even when I'm not in the kitchen opening a door. Ahhh...now I can see all my lovely organized goodies from anywhere in the house. Thank you ITouch! ;-)

Tuesday, August 10, 2010

Pepita Sauce

Admittedly, this lunch was a little weird. I neglected to take a picture of last night's dinner featuring yet another yummy Casa de Luz sauce, so you get to see it yummifying some, perhaps incongruous (tofu, steamed cauliflower, and spaghetti squash), stuff I ate for lunch. Casa's suggested use is on braised greens and any kind of grain too. Pepita Sauce is yet another good all round and easy to make condiment from Casa's repertoire.
One thing I'll mention is that after tasting the sauce, I knew I didn't want to add any salt to the veggies during cooking. Think of the sauce as your salt...you likely won't want any extra.

Pepita Sauce:
(Casa de Luz)

1 cup unroasted, unsalted pepitas (pumpkin seeds)

1 clove garlic

1 tsp. oregano (I used milder Greek oregano)

1 Tbs. flax oil (I used canola)

2 tsp. shoyu (I used reduced-sodium tamari...be careful this doesn't get too salty for you)

1 Tbs. ume vinegar

1 cup filtered water

Pan-roast pumkin sees in a stainless steel skillet, stirring constantly. Remove from heat when seeds are lightly browned, puffed, fragrant, and sound slightly hollow when stirred. Place roasted seeds and remaining ingredients in blender, mix well, and serve.