Sunday, September 26, 2010

Spinach and Rice Casserole

Lovely comfort food that's not too unhealthy...I'll definitely be making this casserole as a Turkey Day side dish. Great, quick-to-put-together weeknight dish that can be a vegetarian meal in and of itself, or as we served it, with chicken sausages and some sliced tomatoes. This is another casserole that hails from Mollie Katzen's Moosewood Cookbook...a book I've been happily rediscovering of late.
We had brown rice already cooked and in the freezer which made putting this together a snap, but because of that I don't have a firm amount on the rice I used. I think using the recipe as written might end up using a higher ratio of rice to spinach? But heck, it IS a casserole. Just use what looks good to you! :-)
I halved the recipe the recipe as printed in the book because we were eating it as a side dish last night. Had plenty for a nice lunch the next day too. I'm writing up the halved version, so just double and use a 9x13 in. pan if you want more.

Spinach and Rice Casserole:
(Moosewood Cookbook; Mollie Katzen)

1 cup uncooked brown rice (I used a combo of brown and a little red)
1 Tbs olive oil
1 cup onion, chopped
3 cloves garlic, chopped
1 lb fresh spinach, finely chopped (I screwed up and cooked it first, then chopped, but I think that was a less messy way to do it in the end)
1/2 tsp Kosher salt, or to taste
1/4 cup raw sunflower seeds, divided (I questioned the use of these, but they really added a great texture! They also up the protein content if this is your whole meal)
1/8 tsp nutmeg
1/8 tsp cayenne
fresh black pepper to taste
1/2 cup low-fat milk (I used unsweetened soymilk)
1 egg, beaten
3/4 cup grated cheese (I used Cave-aged Gruyere, but recipe suggests cheddar)
paprika
Optional: we enjoyed topping our servings with Cholula hot sauce. :-)

Cook brown rice as per package instructions.
Preheat oven to 350 and butter a 1 quart casserole (I think!...I just used what looked like half of a 9x13).
Heat oil in a deep skillet (I used a Dutch oven) on med-high heat.
Saute onion for about 5-8 minutes until soft; add garlic, spinach and salt and cook about 5 minutes more over medium heat, stirring frequently.
Add to the rice, along with nutmeg, cayenne, black pepper and half (2 TBS) of the sunflower seeds.
Beat together egg and milk and add to the spinach-rice mixture.
Add in cheese and transfer to your buttered casserole dish.
Sprinkle with remaining sunflower seeds and dust with sweet paprika.
Bake uncovered for ~35 minutes, or until heated through and lightly brown on top.

Tuesday, September 14, 2010

Rosemary Fig Confit

I made this once, years ago...but with figs all around me in the store figured it was about time for another batch. I add balsamic to taste (probably ~2+Tbs) and a touch of sea salt as the figs simmer. I find it's awfully flat without those additions, but you can be the judge.
The original recipe is for using in sammies made with brie and prosciutto on ciabatta rolls, but I remember liking a wee sammie made with either melty Manchego cheese or Cave-aged Gruyere and just the confit much, much better. So that's how we'll be using this loverly goo tonight. Think I'll make mini panini with Kaltbach Gruyere and the confit as a nice side to soup for dinner.
Fyi...this is awesome stirred into Greek yogurt for breakie!

Rosemary Fig Confit:
(Gourmet, July 1995)

1 cup dried Calimyrna figs, chopped fine
1/2 cup dry white wine
1/2 cup water
3 Tbs honey
1 tsp chopped fresh rosemary
(add balsamic and sea salt to taste as figs simmer)

In a heavy saucepan stir together ingredients and simmer, covered, 20 minutes.
Remove lid and continue to simmer mixture, stirring occasionally, until most liquid is evaporated and mixture is thickened.

In a food processor coursely purée fig mixture.
Confit may be made 5 days ahead and chilled, covered.

Bring confit to room temp before using. Makes about 1 1/4 cups.

Tuesday, August 31, 2010

Chilaquile Casserole

I have to hurry and post this casserole while Hatch chile peppers are still in season!
I made this on Sunday and talk about comfort food. So good, quick and easy, and I just happened to have all the stuff to make it in the fridge! Gotta love that. I'd already made a salsa with a bunch of my roasted chile stash...it was living quite happily in the freezer, just waiting for a yummy recipe like this to go on top of. The best part about this casserole, is that you can really just put anything you think sounds good in it. My tortillas had been purchased to make enchies with and they'd broken in half by the time I'd gotten them home from the store! Those sad tortillas had been sitting in the fridge for at least a week without a purpose, destined for the dustbin. But! They were just perfect for this recipe...they came right back to life. I'll type up the basic recipe then tell you what else got added in.

I guess I'd better type up the salsa recipe too. Even though there's no photo to go with...
You can just buy salsa verde, but homemade is so easy, and always much better.

Chilaquile Casserole:
(Still Life with Menu Cookbook by Mollie Katzen)

12 uncooked corn tortillas
about 1/2-3/4 cup diced roasted Hatch chiles (I used a combo of hot and mild...you could also just use 2 cans of diced green chiles)
2-3 cups grated Jack cheese (I used a combo of sharp cheddar and jalapeno queso fresco)
4 eggs
2 cups lo-fat buttermilk
salsa verde (recipe follows)

Optional additions:
1-2 cups of pinto beans, drained
a touch of cumin
1 cup chopped onion, sauteed until soft
1-2 med. sized cloves garlic, sauteed
1 small diced zucchini, lightly sauteed

I used 1 can of cannellini beans, zucchini and garlic sauteed in a little butter and olive oil with a dash of cumin and a little salt.

Preheat oven to 375.
Butter or oil a 2-quart casserole or a 9x13 inch pan
Tear 6 tortillas into bite-sized pieces and place them evenly into the greased casserole.
Distribute the chiles, then half of the cheese. Now add your beans, zucchini and garlic (or anything extra you chose to put in) evenly over the cheese.
Tear the remaining tortillas and spread them on top.
Follow with remaining cheese.
Beat the buttermilk and eggs together and add salt and pepper to taste.
Slowly pour this custard over the casserole.
Bake uncovered for 35 minutes.
Serve hot, warm, or at room temperature.
Serve with salsa verde.

Hatch Salsa Verde:

5 roasted, skinned and seeded roasted Hatch chiles (I used 2 hot and 3 mild)
6 decent sized tomatillos, cut in quarters
1 clove of garlic
1/4 cup chopped cilanto
juice of 1/2 a lime
salt to taste

Whiz it all up in a blender. Done! :-)

Sunday, August 15, 2010

Zydeco Beans

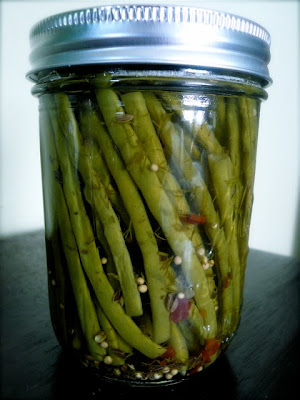
The Monster usually packs a couple pepperoncini in his lunch every day, so I thought I'd try this recipe for pickled haricots verts from Coconut and Lime's blog as a little change up for him. Figure he must get tired of the same ol' same ol' so I try to come of up with little changes to his daily routine lunch so things don't get tooooo boring.

We cracked open a jar (I made 1/2 the recipe...3 jars) yesterday and they've been deemed worthy. The beans remain nice and crunchy and are dilly with a little spice from the red pepper flakes. I think it'd be fun to do a non-dill version with slices of jalapenos instead of the red pepper flakes sometime.

All in all, a fun experiment...that given better canning equipment (read: didn't have a big enough pot for more than 3 jars, and couldn't find my canning tongs), I'd repeat!

Thursday, August 12, 2010

Cashew Cream

I had some girlfriends over for lunch today (fish and chickpea burgers with tartar sauce...yum!), and one of them brought some gorgeous fruit for dessert. Better yet, she brought her Vitamix so that we could experiment making cashew cream to top the fruit with! This recipe is all over the internet in some form or another, but here it is again...cause it's sooo yummy! The recipe I used said that you could use a food processor to make this, just add 1/4 cup of water to start, then add the other 1/4 cup once stuff really gets good and moving. The Vitamix makes this a no-brainer. Just toss everything in and let'er rip.

Cashew Cream:

1 1/3 cups whole raw cashews; soaked then drained (preferably soaked overnight in the fridge covered with filtered water, but I had to speed things up by pouring boiling water over them and just leaving them on the counter from about 8am to 1pm)
1/2 cup water
2-3 Tbs agave nectar or 1-2 dates (our fruit was really sweet so I would add sweetener slowly next time...that said, it went over REALLY well with 3 TBS of agave ;-)
1/2 of a whole vanilla bean or 1 tsp vanilla extract
a squeeze of fresh lemon juice

Toss all the ingredients in a Vitamix or other high-powered blender and blend til nice and creamy. If making in a food processor, add 1/4 cup of water to start, then add 1/4 cup more after the ingredients have had a chance to come together, scraping down the sides frequently.

Should keep well covered in the fridge for several days.

Wednesday, August 11, 2010

Organization!

I finished this project over two weeks ago and it still makes me all wiggly every time I open a kitchen cupboard. Finally! All those wretched little bulk spice bags...gone! That and anything else I buy in bulk that's cupboard worthy (all those stinkin' bags full of different flours are still hiding shamefully at the back of our fridge). I spent 2+ days tossing old stuff, buying fresh stuff, procuring the necessary bottles and jars, filling said bottles and jars, and labeling. I tell you, all those little spice bottles are a sight to behold. The rest of our house may look like heck, but hey those cupboards are organized!

I didn't alphabetize the spices since there were over 50 of them...just tried to place them with spices they'd likely be used with, putting the ones I use often towards the front.
I can't tell you how nice it's been to be able to locate things quickly when cooking, rather than the usual shuffle through a pile of wee bags (most that would eventually develop small cuts and leak all over the place!). I love buying spices in the bulk section. You save a ton of money and don't end up with more than you can use before it expires.

The bottom shelf has always housed vinegars, some dry/wet condiments, hot sauces, etc., but no matter how often I put them in order, they'd squirrel their way out of that order all too quickly. Ok, lazy Susan? A concept it only took me a lifetime to wrap my brain around.

In another cupboard I've got all my baking requirements on the SAME shelf. What a concept! ;-)
Whole grains and legumes live above the baking shelf. Again, no more plastic bulk baggies piled one on top of the other.
On the top shelf lives cake decorating stuff and a few more lesser used items.
Cans live on the bottom shelf.

Lastly, we've got a long pantry with pull-out shelves by the fridge...All. Baggies. Gone!! :-)

I didn't write up this post to inspire you, nor did I compose it to gloat. I'm pretty sure I just wanted to be able to look at these cupboard innards even when I'm not in the kitchen opening a door. Ahhh...now I can see all my lovely organized goodies from anywhere in the house. Thank you ITouch! ;-)

Tuesday, August 10, 2010

Pepita Sauce

Admittedly, this lunch was a little weird. I neglected to take a picture of last night's dinner featuring yet another yummy Casa de Luz sauce, so you get to see it yummifying some, perhaps incongruous (tofu, steamed cauliflower, and spaghetti squash), stuff I ate for lunch. Casa's suggested use is on braised greens and any kind of grain too. Pepita Sauce is yet another good all round and easy to make condiment from Casa's repertoire.
One thing I'll mention is that after tasting the sauce, I knew I didn't want to add any salt to the veggies during cooking. Think of the sauce as your salt...you likely won't want any extra.

Pepita Sauce:
(Casa de Luz)

1 cup unroasted, unsalted pepitas (pumpkin seeds)

1 clove garlic

1 tsp. oregano (I used milder Greek oregano)

1 Tbs. flax oil (I used canola)

2 tsp. shoyu (I used reduced-sodium tamari...be careful this doesn't get too salty for you)

1 Tbs. ume vinegar

1 cup filtered water

Pan-roast pumkin sees in a stainless steel skillet, stirring constantly. Remove from heat when seeds are lightly browned, puffed, fragrant, and sound slightly hollow when stirred. Place roasted seeds and remaining ingredients in blender, mix well, and serve.