Thursday, June 26, 2008

Black-eyed Peas in Gravy (Raungi ki Rasewali Subzi)


Black Eye Peas in Gravy- Raungi ki Rasewali Subzi:
(adapted from Dear as Salt's blog)

2 cans of black-eyed peas/raungi/lobia//chawli/karamani, drained and rinsed, or you can cook up 1 cup dried
2 tbsp oil
1 tsp whole cumin seeds
a small piece of Cinnamon
1 dry red chili
1 medium onion finely chopped
2 big cloves garlic, minced
1" piece ginger very finely grated
1/2 tsp red pepper (as per taste)
1/4-1/2 tsp turmeric powder
1 tsp ground coriander (grind fresh for best taste)
1/4 tsp garam masala pwd (more if it is store bought)
1/2 cup+ plain yogurt (I used a combo of non-fat Bulgarian and 2% Greek and used more than 1/2 cup)
salt to taste
.
1. Heat oil.
2. Add cumin seeds, let splutter.
3. Add cinnamon, red chili and stir. Add finely chopped onion and saute until they brown.

4. Add ginger/garlic paste & saute till it gets incorporated in the onions.
5. Reduce heat, add all spices and stir a few seconds.
6. Add yogurt, little at a time and keep stirring well...the proteins in the yogurt tend to want to curdle I found. So do stir well and keep the heat very low. This was probably originally to be made with cream.
7. Add black-eyed peas and simmer on low for 10 minutes. Add salt taste.

2 cans of black eyed peas probably don't equate to 1 cup dried, but I didn't just want to use 1.5 cans and end up wasting the rest. The original recipe looked more saucy due to less peas I suspect. I served it over fresh baby spinach tossed with a little lemon with whole wheat pita flatbread on the side.

Wednesday, June 25, 2008

Tamarind Fish


This recipe comes from Hooked on Heat's blog and was very tasty.

Tamarind Fish:
Serves: 2

2 large fillets of any white, flaky fish (I used Tilapia), cut into 1-inch cubes
1 medium onion, thinly sliced
1 medium tomato, finely chopped
1 medium green pepper, thinly sliced (I used a red bell instead)
1 tsp crushed garlic
1 tsp tamarind concentrate
1/2 tsp mustard seeds
1/2 tsp red pepper powder
1/4 tsp turmeric powder
salt, to taste
2 Tbsp light cooking oil
chopped cilantro

Saute mustard seeds and sliced onions in hot oil until soft and lightly browned.

Add in turmeric, red pepper, salt, chopped tomatoes, garlic and tamarind, and cook until tomatoes pulp and spices have blended in well.

Stir in fish and green peppers, and stir fry on medium heat until fish is cooked through, making sure not to break fish too much. Garnish with cilantro before serving.

Serve with rice if you wish.

Sunday, June 22, 2008

Chicken Meatball Soup with Veggies and Noodles


A testament to how great it was visiting with Joelle over dinner last night...no photos! Durn!
Because now I have the perfect recipe to share with you and it calls for only 3 ingredients.

a great friend (or friends)
a communal food platter that's close to everyone's paws
no utensils!

I'm pretty sure this will work every time you make it. Although it's been tested just this once as written, I plan on recreating it over and over...just to make sure it's a sound recipe. :-)

Last night we enjoyed (besides, the great conversation, good wine, good music...) a centrally placed dish of baked chipotle shrimp. I thought it was much better this second time. I used 1.5 lbs of large shrimp instead of the mediums (baking them a little longer) and used a fuller bodied red wine in the broth. We couldn't stop sopping up the sauce with hunks of the multi-grain baguette. Too yummy. We also each had our own big artichoke served with a lemony mustard-mayo sauce. Again...too yummy. No room for the salad I'd planned, so we saved any room we had left for devouring fresh fruit crisps. We just used the strawberry crisp recipe substituting ripe peach slices and fresh blueberries for the strawberries. The Monster decided he liked those even better than when they're made with strawberries, so now I'll be using whatever fruit looks most luscious at the store in the future.

And now, on to the recipe for today's recovery. This is one of my favorite healthy soups.
The chicken breast meatballs have a nice texture from the masa harina and the carrots, kale, and leeks should leave you feeling quite virtuous. Really any vegetables will do, I just happen to like this combo and the kale holds up nicely in the broth. I use a handful of spelt egg noodles to add a little more body to the soup, but you can leave them out altogether if your need for atonement runs deep.

Chicken Meatball Soup with Veggies and Noods:

1 lb ground chicken breast
2 cloves minced garlic
1-2 Tbs. grated onion
pinch of herbes de Provence, or Italian seasoning
4 Tbs Masa flour
1 tsp kosher kosher salt
ground black pepper

2-3 leeks, white and light green parts only, well washed then sliced
1 cup organic baby carrots, halved
12 cups organic chicken broth (3 cartons), or homemade.
1 bunch of organic curly kale, chopped (this time I'm using ~2 bunches of lacinato kale because I'm tired of all the work it takes to wash the bugs out of the curly stuff!)
~1 cup spelt egg noodles

Saute sliced leeks in knob of butter (or olive oil) with a little salt for ~5 min, add carrots and cook a minute more.
Add chicken broth and bring to boil.
While broth is coming up to a boil, combine first 7 ingredients and make 1 inch meatballs. Dipping hands/fingers in warm water in between each will make it easier to roll them. Set aside.

Once the broth is boiling, reduce heat and slowly add meatballs one at a time. Simmer on low for ~30 minutes, occasionally skimming any foam that might rise to the surface.
Add kale and egg noodles and cook ~10 min more.

And just to see if I can get ANYONE to make our favorite pancakes...I really can't believe no one has tried them with all my pleading. This is from our Sunday breakfast. Oatmeal pancakes topped with agave sweetened Greek yogurt and fresh nectarines with blueberries. Just nix the ginger from the original recipe, and use about 1 Tbs of Sucanat instead of 2 tsp.
You really don't know what you're missing if you don't give these a shot! :-)

Wednesday, June 18, 2008

Trout with French Lentils and Mustard-herb Dressing


I found this fabulous recipe that called for salmon recently in a search for more reasons to use yummy French green lentils. Only problem is...my wild salmon that used to be 10 dollars a pound is now 25. I didn't want to use tilapia...AGAIN, so my pal James suggested trout instead, given it has a lot of salmon-like qualities. I also wasn't up for all the butter that the original recipe called for. 8 Tbs total. So instead of a mustard-herb butter, I made a dressing using olive oil. Another change I made was baking the fish in lieu of sauteing it in butter as per the original recipe.
I'll be making this easier than it looks recipe over and over again.


Trout with Lentils and Mustard-herb Dressing:
(adapted from Gourmet)

Mustard Herb dressing:

If you're making 4 filets you might want to extend the dressing. This amount was perfect for 2. Just make sure that you don't put 1/2 of the dressing in your lentils as the recipe states if you make a larger amount. I think a little over a Tbs is a good amount for the adding to the lentils.

2 Tbs. olive oil
1 Tbs. chopped chives
1 tsp chopped tarragon
2 tsp grainy mustard
2 tsp fresh lemon juice
a pinch of kosher salt
~1/4 tsp fresh ground black pepper
I put a tiny little squeeze of agave in to balance the flavors

Lentils:

1 cup French green lentils
4 cups water
2 medium leeks (white and pale parts only)
~1 Tbs olive oil
water or broth for sauteing leeks
1/2 to 1 Tbs fresh lemon juice
salt and pepper to taste

Trout:

4 (6-ounce) pieces of skin on steelhead trout (I bought 1 lb of trout and baked it whole...this made three portions. It would have looked prettier had I cut the fish before baking, but it was nice and moist this way)
a little dab of olive oil
salt and pepper

Make mustard-herb dressing by mixing all ingredients together except oil.
Drizzle the oil in slowly whisking quickly to emulsify.

Bring lentils, water, and 3/4 tsp salt to a boil in a heavy medium saucepan, then reduce heat and simmer, uncovered, until lentils are just tender (20-25 minutes).
Reserve 1/2 cup of cooking liquid, then drain lentils. Or, if you're on the phone jabbering away and accidentally toss all the liquid you can use veggie broth like I did. :-)

Preheat oven to 450.

While lentils cook, chop leeks, then wash thoroughly.
Cook leeks in olive oil in a heavy medium skillet over medium-low heat, stirring occasionally until softened.

If found that the leeks took longer than I'd expected to soften...probably due to the reduction of fat, so after they'd sauteed in the oil for about 6-8 minutes I added some chicken broth, covered the skillet, reduced the heat and simmered until they were soft.

Place lightly oiled fish skin side down on a foil-lined baking sheet. Salt and pepper the fish then bake for 10 minutes per inch of thickness (my fillet took 13 minutes total), or until fish is done and flakes with a fork.

While fish is baking, add lentils with reserved cooking liquid to leeks along with about 1/2 of the mustard-herb dressing and cook, stirring until lentils are heated through. Add lemon juice and salt and pepper to taste. Keep warm until fish is done.

When fish is done, slide the fish off the skin and serve topped with remaining dressing, over lentils.

Sage Chicken with Lemon Sauce


Back before we had "Sage-zilla" taking over the rest of the herb garden, I used to buy those pre-packaged herbs from the grocery store at $2.20 a pop. I'd bought a packet of sage for a different recipe, but had plenty left. This recipe was printed on the package, so I thought I'd try it out. Last night, I had a carton of whipping cream that hadn't gotten used for our anniversary dessert, so it was time to make this again. Although I didn't have the energy to play with this last night, I do plan on making it healthier so we can eat it more often. It's a nice dish that I'll try subbing Greek yogurt for cream in next time. I won't use the full 2 Tbs of butter either. Just enough to brown the chicken a bit.

Sage Chicken with Lemon Sauce:

6 boneless chicken breast halves (my pan will only hold about 3 flattened breasts, but I still make the whole amount of sauce)
2 tablespoons flour (I used brown rice flour)
Salt and pepper
2 tablespoons butter (I used less, but will use even less next time)
1 tablespoon olive oil
10 sage leaves
1 lemon, sliced in rounds
1/2 cup chicken broth
1/4 cup dry vermouth
1/4 cup whipping cream

Pound chicken breasts to ~1/4" thickness.
Put flour on a plate.
Sprinkle chicken with salt and pepper on both sides.
Dredge chicken breasts in flour, then set aside.
Melt butter and oil in skillet large enough to hold chicken breasts without crowding.
Add sage leaves, saute for a few minutes, then remove and set aside.
Add chicken breasts and saute on both sides until lightly colored (about 2 minutes per side?)
Add broth, lower heat to a simmer and cook chicken on both sides until its slightly underdone about 4-5 minutes.
Remove chicken and set aside.
Add vermouth and lemon slices to pan and boil for 3 minutes, scraping up bits of chicken from the bottom of the pan.
Remove lemon slices.
Add cream and sage leaves and simmer for a minute, stirring constantly, until cream is warm and sauce has thickened.
Return chicken to pan and simmer on low for 1-2 minutes to warm back through.
Divide lemon slices and sage among the pieces. Top each serving with a spoonful of sauce.

Monday, June 16, 2008

Asian Sweet Potato Chowder


I'm not sure this even sounds good today. It's at least 101 outside and hot soup? Hm...
The Monster thought this sounded like a good one, so even though I found the recipe this past winter, we're giving it a try tonight. A nice cooling cucumber salad might balance it out. We'll see what I come across in the fridge...
(We really enjoyed this btw. It'll be a keeper)

Asian Sweet Potato Chowder:
(Southern Living)

1 tablespoon minced fresh ginger
2 garlic cloves, minced
2 teaspoons curry oil*
6 cups organic chicken broth (or veggie broth)
4 sweet potatoes, peeled and chopped (2 pounds)
1/2 cup coconut milk (freeze the leftover milk for the next round of soup making)
1/4 cup light sour cream (I used 2% Greek yogurt)
1 1/2 teaspoons grated lime rind
1/4 cup fresh lime juice
1/4 cup chopped green onions
3 tablespoons chopped fresh cilantro
Garnish: fresh cilantro sprigs
Optional: a squirt of siracha chile sauce

Sauté ginger and garlic in hot oil in a Dutch oven for 1-2 minutes. Add chicken broth and sweet potato; bring to a boil. Reduce heat, and simmer, stirring occasionally, 20 minutes or until potato is tender.

Add coconut milk and next 3 ingredients; cook, stirring occasionally, until thoroughly heated (do not boil). Remove from heat. At this point I used a stick blender to thicken the soup slightly. Most of the sweet potato pieces remained intact, but the few that got whizzed up colored the soup nicely. Add green onions and chopped cilantro. Garnish with cilantro sprigs if desired.

*If you can't find curry oil, substitute sesame oil and add 1/2 teaspoon curry powder.

Yield: 7 cups...this would serve 4 at about 265 cals per bowl iffn' your interested. ;-)

Thursday, June 12, 2008

Barley Salad with Fresh Herbs and Blackened Tofu Steaks


You can certainly make this salad with or without the barley...I just wanted to combine our grain with a salad last night. The original recipe came from Whole Foods website, but I changed it by using the veggies I had on hand...ie. tomatoes and limas in place of red bell pepper.
"Whole Paycheck" suggests serving the salad in an avocado or papaya half...

Barley Salad with Fresh Herbs:
(Adapted from Whole Foods recipe)

1 cup pearled barley
3 cups+ water
~3/4 lb frozen baby lima beans
~1/2 cup sliced green onions
2 medium tomatoes, chopped
~1/3 cup chopped fresh basil
~1/3 cup chopped Italian parsley
~2 Tbs chopped fresh mint
1 clove garlic, minced
kosher salt to taste
fresh ground pepper to taste
lemon juice (I think I used 1.5-2 lemons worth)
~1-2 Tbs? canola oil

Add barley to water in a saucepan and bring to a boil. Reduce heat and simmer for ~35-40 min.
Test to see if its done to your liking before that...

While the barley is cooking:

Bring another pot of water to the boil.

In a large bowl, mix the garlic, lemon, salt and pepper, and canola oil (next time I might add a little mustard too). Set this aside.

When your water has come to a boil, salt the water well, then add your limas. Cook limas as per package instructions.

Drain the cooked limas and then add to the dressing in the large bowl. Stir to coat.
Add all of your other veggies and herbs at this point.

When the barley is done, drain it well then add some of it to the salad.

I didn't use all of it, since I wanted more green and less grain. Save the rest for a soup or to use in place of rice in something else.
Adjust seasonings at this point.

I just set it on the counter until the rest of dinner was done so I could serve at room temp.
We ate this over a bed of baby spinach that had been dressed with a little more lemon juice, a drizzle of olive oil, salt and pepper.


Blackened Tofu Steaks:

1 pkg of organic extra-firm tofu (I like White Wave if you can get it)
Creole seasoning rub
canola oil

Cut the tofu block into 6 slabs. Press as much of the water out as you can. I end up using a lot of paper towels for this.
Need an alternative to that method...maybe some new tea towels are in order.
Once you've gotten the tofu fairly dry, sprinkle with seasoning mix and rub in a little on both sides.
Now brush each side with some canola oil and cook in a non-stick skillet on high heat for about 5 minutes a side, or until done to your liking. That's it.

Sad Kitty


Our wee Chickpea just devoured our economic incentive check from Duh-bya.
She's all curled up next to me in her doughnut recovering from being run over by a truck...she thinks. In actuality, she just had all the things in the above photo (aside from the pill bottle cap!) removed from various parts of her furry round body. 4 large bladder stones (other 3 are on their way to a lab for analysis), a canine tooph, and last but not least a pellet, lodged in her arm in a former life. Poor girl's been through the ringer, but we're so glad to have her home and on the road to wellness. If only Auntie J's acupuncture wunderkind were in Texas. The Loaf would probably be doing backflips already. ;-)
I made a great chicken soup the first night she had to spend in the hospital, but was in no mood to write it up, take a photo, or otherwise. Too bad, it was yummy.

Monday, June 9, 2008

Anniversary Dinner: Tilapia with Prosciutto and Sage

This was our ninth anniversary dinner from the 5th. I just didn't feel like getting all dressed up to go out, so opted for a nice dinner at home. The Monster brought home a gorgeous bouquet a flowers and the same card that I'd bought him! Too cute. I gave him a horrendous pile of dishes to do...not cute.

This was the meal that produced said pile...

We started the meal with some nice big artichokes. Something The Monster said he'd never eaten before meeting his California gal. I cooked them submerged in boiling water with slices of lemon until the outer leaves pulled out easily. Here's a link that could help you non-artichoke eaters out a bit. She steams hers though.
The dipping sauce is a mix of mayo, Greek yogurt and balsamic vinegar. Yum!

And next...

Tilapia with Prosciutto and Sage with Toasted Walnut Sage Cream Sauce:
(Adapted from Gourmet, December 2004)


Prosciutto and sage add deep flavor to tilapia, which is a mild fish. Separating the two sides of the fillet helps to keep the thinner part from overcooking.

Makes 4 servings.

4 pieces skinless tilapia fillet (2 lb total)
8 thin slices prosciutto (not paper-thin; 6 oz total (I used an artisanal prosciutto di Parma and I used all 8 slices between 2 filets of fish split into 4 pieces.)
12 fresh sage leaves, stems discarded
4 teaspoons olive oil
preparation
Cut fillets lengthwise to separate smaller and larger portions, then pat dry and season with pepper. Wrap each piece of fillet crosswise in a slice of prosciutto, leaving ends of fillet exposed if necessary and tucking 1 or 2 sage leaves between prosciutto and fillet (use 1 leaf for smaller pieces of fish).


Heat 2 teaspoons oil in a 12-inch heavy nonstick skillet over moderately high heat until hot but not smoking, then sauté the 4 larger pieces of fish 4 minutes. Turn over and sauté until just cooked through, about 3 minutes more. Transfer to a platter and keep warm, loosely covered with foil. Wipe skillet clean and heat remaining 2 teaspoons oil, then sauté the 4 smaller pieces of fish, turning over once, until just cooked through, about 4 minutes total.
Plate over Savory Polenta and finish with Toasted Walnut Sage Cream.

Toasted Walnut Sage Cream:

This is another take on my Pepita Sage Cream Sauce...

pat of butter
1 Tbs chopped fresh sage
about 1/4 cup chopped walnuts
couple good spoonfuls of 2% Greek yogurt
fine sea salt
unsweetened soymilk, or milk of your choice to thin the sauce

In a small saucepan, melt the butter and add the walnuts.
Toss in the sage and cook on medium until the walnuts are a little toasty.
Let them cool slightly then add them and yogurt to a blender and puree.
Add salt to taste and thin with soymilk, or milk of your choice.
Chill in the fridge until you're ready to use it.

Savory Polenta:
Alton Brown's method cooks in the oven freeing up your time to focus on preparing the rest of the meal. I've made it this way 3 times now, and there's no going back to stove top for me!
The only thing I would suggest, is to hold back on the amount of salt he uses. Just add it in to your taste, since the cheese is already salty. You might want the whole amount, but just adding it slowly ensures you won't end up with a too-salty batch. The next day I made a salad of arugula greens with fried egg on top and crispy on the outside-gooey on the inside polenta fingers on the side. I dressed the salad with lemon, olive oil and some of the leftover cream sauce...so good! Just slice up the leftover polenta and saute it in a non-stick skillet with a little olive oil until golden brown on both sides. Serve warm.

We finished the meal with a simple palette cleansing salad of arugula, avocado, and chevre. Tossed only with lemon juice, olive oil, salt and pepper. Perfect. Least the "Peazer" though so.

Sunday, June 8, 2008

Chocolate Biscotti


About 2 years ago Christmas I hit a wall where biscotti baking was concerned. Totally burned out in the biggest way possible. Debbie and I embarked on baking a good 300+ biscotti to give as Christmas presents. She's got 3 ovens and a nice collection of Kitchen Aid mixers at her house, so that's where we set up shop after having procured a vast amount of ingredients needed at Costco and Central Market. I'm going to let you in on some hard won knowledge now. Please don't be upset, but I'm going to have to use all caps....DON'T EVER BUY ANISE SEEDS IN THE BULK SECTION OF ANY SUPERMARKET. Anise seeds have an unfortunate resemblance to CUMIN seeds! Let me just mention that we made all the dough before baking any of the 10 batches of biscotti off. Need I go on?
Who knows if it was a genuine mistake or a cruel prank, but there were definitely cumin seeds mixed in with the anise seeds. I walked away from the whole business. Could not face giving away those freak show biscotti...though several people claimed that they were still edible.
They ended up in the trash...such a waste. I remained pretty put out about the whole episode for for a looooooong time.

But! The other day I had a gift that needed giving. These are what were made...my first foray back into the biscotti baking arena. I still couldn't bring myself to make the old recipe, but this was a wonderful alternative. Although they don't fall into the category of being a healthful treat, they sure were good. Even better, I got to eat just a few then send the rest on their way! ;-) If you're a chocolate lover, you should give these a go. Fantastic dipped in a hot steaming cup of matte latte tea (now that I've eschewed coffee!).

The recipe comes from Farmgirl's blog...that I go to every day for my "daily dose of cute." :-)

Farmgirl Susan's Biscotti For Chocolate Lovers:
(only slightly changed...) Makes About 36 Pieces

2/3 cup (4 ounces) semisweet,dark chocolate chips, or chopped chocolate (I used dark choc. chips)
1/2 cup (1 stick) unsalted butter
2 eggs
1 cup granulated sugar (I used evaporated cane juice baking sugar)
1 teaspoon vanilla
2 to 2-1/4 cups all-purpose unbleached flour
1/2 cup unsweetened cocoa
1-1/2 teaspoons aluminum-free baking powder (make sure it's fresh)
1 teaspoon salt
1 Tbs corn meal (This is the only change I made to the recipe...a hold over from James' mom's recipe. :-) I like the texture it adds since there aren't any almonds in this one.)
1 beaten egg white for glaze

Farmgirl writes "Make it a Mochaccino!":
Adding 1 Tablespoon of instant espresso powder (Medaglia D'Oro brand) in with the dry ingredients does amazing things to this biscotti. (I didn't use this in my batch, but I'm sure it'd be delish.)

1. Heat oven to 350 degrees. Melt the butter and chocolate together (I put them in a Pyrex measuring cup and microwave them) and set aside.

2. Beat the eggs and sugar until lightened (I use an electric hand mixer and beat them for about two minutes.)

3. Add vanilla and chocolate mixture.

4. Mix in the flour, cocoa, baking powder, and salt just until combined. You should have a soft, but not sticky, dough. Add the extra 1/4 cup of flour if dough is too sticky. (I had to add the extra 1/4 cup)

5. Divide the dough in half. On a lightly floured surface, form each half into a log that is 3-1/2 inches by 9 inches. Place logs on a large baking sheet and brush with egg white and sprinkle with a dusting of evaporated cane juice sugar.


Bake for 25 minutes or until tops are set.

6. Reduce oven to 275 degrees. Let logs cool as long as you can (the cooler they are, the easier to cut), and then slice into 1/2-inch thick slices. Arrange the slices on baking sheet and bake for 20 minutes. Remove from oven, carefully turn slices over, and bake for another 20 minutes. Cool on a wire rack. Store in an airtight container or freeze.

Greek Yogurt Pancakes with Chocolate-Cashew Spread


It has been a loooong while since we had our regular weekend pancake or waffle day. So we were eager to get back to that tradition this weekend. On the menu was a yummy batch of our oatmeal pancakes....wrong! Last night I asked The Monster to mix the buttermilk with the oats and set them to soak overnight in the fridge while I went to brush my teeth before bed. This is what I hear from the kitchen while brushing...."Honey? Is the buttermilk supposed to be chunky?" The answer to that my friends, is a resounding no. ;-) The whole previously unopened container was one big solidified chunk. We assessed at that point that it probably wasn't a good idea to proceed with the oatmeal pancakes for Sunday breakfast plan. Off to Bob's Baking Book I went! I found that we had all the ingredients for these lovely pancakes/crepes. Maybe not quite as nutritious, but an enjoyable change nonetheless. And if you make them with a good yogurt, infinitely better for you than with sour cream. I'm thinking that they could probably be made using all whole wheat pastry flour, but I thought I'd make them as written for the first go. If you're worried about cholesterol you could probably use an egg substitute for the 4 eggs.
We had pancake blowout from the first batch that hit the griddle (impossible to flip them without making a huge torn mess), so I thickened the batter slightly with 2 more Tbs of whole wheat pastry flour. Watch that your griddle isn't too hot. It's a delicate batter that needs some care.

Delicately Delicious Sour Cream Pancakes:
(Bob's Red Mill Baking Book)

Makes about 24 pancakes

4 eggs
2 cups sour cream or plain yogurt (I used 2% Greek yogurt mixed with a little non-fat Bulgarian yogurt)
1/4 cup unbleached white flour
1/4 cup + 2 Tbs whole wheat pastry flour
1 1/2 tsp baking soda
2 Tbs sugar (sucanat, or agave nectar which I used)
1/4+ tsp fine sea salt

Heat your oven to 200 with an oven safe dish and a piece of foil placed inside.
Lightly oil and heat a griddle over medium heat.
Place all ingredients in a blender and puree, stopping every few pulses to wipe down the sides with a rubber spatula.
Ladle about 1/4-1/3 cup batter onto the griddle and cook over medium heat until bubbles appear, about 2-3 minutes.
Turn and cook until golden brown on underside.
We keep the pancakes in the oven under foil until the last one comes off the griddle.
Serve with pure maple syrup, or a fruit sauce (or chocolate-cashew spread!!! impromptu recipe follows)

Chocolate-Cashew Spread:

When we were in Paris last year, we ate our fill of Nutella filled crepes from street vendors. This morning (after I'd made blueberry sauce for the pancakes!), when we realized these pancakes were more like mini crepes, The Monster said, "Too bad we don't have any Nutella!"
No, says I...but we have cashew butter and chocolate chips and a gal that's more than willing to experiment! So I set to work while he was flippin' cakes.


Equal parts roasted cashew butter and melted dark chocolate chips (just melt the chips in the microwave, taking care not to burn the chocolate)
fine sea salt to taste
agave nectar to taste
a couple splashes unsweetened soymilk or other type of milk

Mix the cashew butter and chocolate together.
Add salt and agave nectar to taste.
Thin with milk until it reaches a consistency you're happy with.
That's it! Spread the delicious goo on hot (or cold I just realized quite pleasantly 10 minutes ago!) crepes, roll and eat.

I dusted our breakfast crepes with some powdered evaporated cane juice sugar. Keep any leftover spread covered in the fridge.

Friday, June 6, 2008

Crunchy Buckwheat Cereal

I have NO idea where I got the idea to do a search for buckwheat. Just popped into my head yesterday. But this recipe is what that search yielded. I'll be looking for more ways to incorporate buckwheat into our diets after doing further research on it's properties of goodness. Buckwheat is not a grain at all apparently...it's classified as a fruit and is related to rhubarb. It's gluten- free and has nothing to do with actual wheat. I found a lot of nutritional info on buckwheat, but honestly Oprah's website distilled it best and presented it in the most plain lingo. So I'll link to that buckwheat info page instead. ;-)

Crunchy Buckwheat Cereal:
(VegFamily Magazine)


If you like those Middle Eastern sesame honey candies, this is the cold cereal for you! It totally reminds me of them for some reason...even though I didn't use tahini or honey. :-) I personally think it makes more than 4 servings. I liked it mixed with a lighter puffed cereal (I'm going to mix it with plain puffed kamut tomorrow). It'd probably be too overwhelming to eat a 1/2 cup plain. Another great option is eating this with fresh berries over plain yogurt. Might have to do that tomorrow instead of the kamut! In any case...it's super easy to make, and really good for you. I just happened upon the recipe yesterday and decided to make it this morning for breakfast. The Monster had already eaten his bowl of regular cereal, but I sure enjoyed it!
  • 2 cups raw whole buckwheat groats (I bought mine in the bulk section of the regular grocery store)
  • 2 tablespoons maple syrup, brown rice syrup, or agave nectar (I used agave nectar)
  • 1/4 cup nut or seed butter...almond butter, tahini, etc. (I used roasted unsweetened cashew butter, also from the bulk section)
addendum: I have to say...I've started adding a touch (~1 Tb each?) more of both the nut butter and the sweetener and it's extra yummy, just an fyi. ;-)

Preheat oven to 300ºF.
In a medium sized mixing bowl, combine nut butter and sweetener and set aside.
Spread buckwheat on large baking sheet.
Bake for 20 minutes.
Stir buckwheat around a bit.
Roast for 15 to 20 minutes more until golden. I went for the full 20.


Immediately mix hot buckwheat into sweetener and nut or seed butter until buckwheat is coated. Cool. Store in covered jar in refrigerator. To serve, place 1/2 cup of cereal in bowl, cover with milk. Add fresh or dried fruit if desired.

Makes 4 servings

I love this either with unsweetened soymilk, or just sprinkled on top of plain yogurt.

Update:
All right, maybe I'm just a weirdo...but I can't stop eating this stuff! I just finished my 4th helping of the day! I'm loving just snacking on it plain...Ok, now you can make it. :-)

Thursday, June 5, 2008

Chicken Pot Pie...Sans Pie


I'd planned on making the Moroccan Chicken Pot Pie again last night, but got lazy (kind of).
Why not just make the filling and serve over brown rice? Great comfort food and I was able to throw extra veggies in that I had hanging out in the fridge and pantry since I wasn't working under the constraints of a 9" pie pan. What was left of the freakishly-large-head of cauliflower, a random red potato, and some frozen baby lima beans joined the carrots, onion and frozen peas called for in the original recipe. I bumped up the amounts of all of the spices, threw in a few dried apricots with the golden raisins, and added some extra low sodium chicken broth to make it a little saucier for the rice. The brown rice was cooked in a rice cooker with nothing more than a nice carroty veggie broth and a little extra water. Best part is...there are plenty of leftovers to keep munching on.
This can be a great fridge cleaner meal. Really, just use any vegetable combo that appeals to you. If you wanted to save even more time, I think they sell a frozen mix of veggies specifically for pot pie type recipes.
I made our standard Braised Greens recipe with collards to round out the meal.


Moroccan Spiced Chicken Pot Pie Filling:

First I brought a 3-quart pot of salted water to the boil to which I added the baby lima beans. Cooked them for 6 minutes, then added diced red potato and cauliflower florettes. Cooked the whole thing for about 3 more minutes, then drained and set aside.

In a large oven safe pot, cook the onions, carrots, olives, raisins (and apricots if using) as per the original recipe for about 6-7 minutes. I salt this mixture with some Kosher salt.

Continue following the original recipe, adding the veggies you've set aside at the same time as the chicken broth.


Cover the pot and put the whole works into the oven for about 25-28 minutes. The original recipe calls for a 425 degree oven, but I set mine at 400 this time because the knob on the lid of my enamel pot would not have cared for the extra 25 degrees. :-)

Wednesday, June 4, 2008

New Shoes!! A thank you for Uncle Marty :-)

Let it be known...I have big feet. As most of you know, I'm 5'-11" and I constantly bemoan the fact that it is nigh on impossible to shod my size 11 1/2 feet. Do you realize that us size 11 1/2ers are totally ignored by most shoe manufacturers? If a shoe even comes in a size 11 and 12 there is no in between size...EVER! Ok, by this point you've realized that this post probably has nothing to do with food. It wasn't really supposed to be a rant either. But at least now you've got a slight understanding of my frustrations in the shoe department.
This has been an even bigger problem since I started working out last year and wanted some 11 1/2 sneeks in a womans shoe. And now we come to the gist of the post...
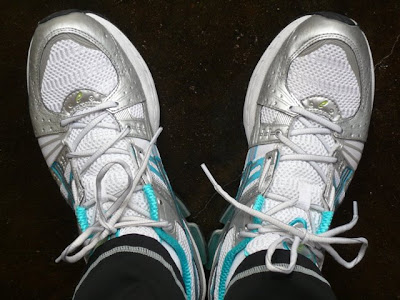
This is a biiiiiiig huuuuuuuge thank you to my Uncle Marty and Auntie Judy who hunted down a pair of awesome 11 1/2 women's Asics for me and then sneaky-style gave them to me for my birthday! They're not a drab "boy" color, and they are not too wide for my feet...like most of the men's shoes I've had to purchase in the past. No, they're perfect size 11 1/2 womens shoes! :-) So thanks a million guys!

For Uncle Marty:
I've tried to come up with some of the exercises I do that focus on strengthening the back and general core muscles for you. Be careful when you do them...I'd hate to make your gimpy back worse! Really important too is just making sure that you stretch those hamstrings at least 3 times during the day. I forgot to take photos of some of the simple stretches I do, but I'm sure they're not anything you haven't done before. My physical therapist had me stretch my hamstrings by putting my heel up on a chair and bend forward at the waist with a flat back (~15 per leg, then repeat for 3-4 times a day). The second thing he had me do was to lay on my back and draw my left knee up to my right shoulder and hold for 1.5 minutes. Then do the same with the other knee...really relaxing into it. Do this one 3 times a day too. Just making sure to do those two stretches throughout the day really made a difference for me.
This first exercise I'll write up REALLY helped build up my back and get over the constant lower back pain. Seems simple, and it is...but that's good, because maybe you'll do them. :-)

Cobras 1:
(2 sets, work up to 20 reps per set)

This is a good place to start for strengthening your back. Get a mat (hopefully squishier than the yoga mat pictured!) and lay face down, arms at your sides with palms down.


I'd like you to concentrate on keeping your spine in a neutral position. This means tilting your pelvis forward and drawing your tummy in and up. Hope that makes sense. The first photo is me just flat on the floor...


But in this photo, you'll see that my pelvis is tilted forward and I'm drawing my belly button to my spine. This is a neutral position for the spine. Just be conscious of trying to do this in most of these exercises.

Ok, so back to the cobras...Start face down, arms at your sides palms down (ok, I just realized that my palms are up! This is one of the reshoots and I wasn't concentrating. D'oh. A case of do as I say not as I do!) :-), spine neutral.
Now lift your torso, arms and legs at the same time for about a count of 2. Just a nice easy motion, don't stretch beyond what you're comfortable with and keep your face down. "You're not a hood ornament" said my trainer. ;-)

When you feel strong enough you can move on to doing these on the ball. I actually go back and forth between the two depending on how I'm feeling each day.

Cobra 2 (on the ball):
(2 sets of 20)

Back yourself up to a wall to steady yourself while draped over the exercise ball. You can link your thumbs together if you want.


Now lift your torso and arms up for about a count of 2. Do 2 sets of 20.


Crunches on the ball 1:
(2 sets work up to 40 reps per set)

Doing crunches on the ball will make you use your core for balance. To start out bend your knees and tilt your back to 45 degrees. This will be your starting postion for this beginning crunch.


Now with hands behind your head, neck relaxed! and looking at your abs, curl up in a crunch.


Ball Crunch 2:
(2 sets work up to 40 per set)

At this stage, you'll lean back over the ball keeping your legs at a 90 degree angle to the floor.
Just do a normal crunch. You'll have to work harder than in Ball Crunch 1 since you're bent back further over the ball, but your back will need to be a little stronger to do this.


Ball Crunch 3:

If Ball Crunch 2 is getting too easy for you, hoist those feet up against a wall at about a 90 degree angle and do the crunches like that. Each time you move to another stage with these, you might need to lower the amount you do. Work up to doing 40 per set.


Obliques 1:


I'd work up to doing 20 each side, with whatever weight feels comfortable to you. Make sure you're lowering yourself directly to the side...not leaning slightly to the front or to the back. There's more of a tendency to hurt yourself if you're not going straight to the side (so said my trainer). Keep your belly button pulled in to your spine, your neck and the arm that's holding the weight relaxed as you let it drop to your side. Be conscious of keeping your spine in a neutral position. Once you feel strong enough doing these, you can try working your obliques using the exercise ball instead...Obliques 2.

Obliques 2:
(work up to 2 sets of 20 per side)

Using a wall for balance, ease yourself onto the ball so that your right hip and thigh are resting on it. Put one foot in front of the other on the wall and when you find your balance, put your right hand behind your head and your left hand on your waist.


Drop to your side and then come back up for a side crunch. Repeat.


Airplanes:
(2 sets of 14 reps per leg )

Holding an 8-10 lb weight in your right hand, stand feet about hip distance apart, belly button to spine. Now with a flat back, bend at the waist and let your right leg go back to balance you as your right arm with the weight drops down and across to the left (this is just used as a counterbalance, not actually doing any lifting here). Your left arm will go out to the back with your right leg. The left leg can bend a bit in a semi-squat. Relax those monkey toes on your left foot! I know they're trying to curl up in that shoe. :-) This is a great exercise that works on your balance and helps with the core muscles too. Keep reminding yourself to keep your back flat and belly button pulled in and up...thus engaging the core. Boy am I glad there's a picture for you to look at! I don't know why there's no photo of the standing position, but I'm sure you can figure that one out.


Ball pull-in:
(2 sets 14-16 reps)

If you have tight ham strings this might be hard at first. I had to stop the first time I did them and stretch so I wouldn't get a spasm! But, they're good for that core stability while you're getting a leg workout. It got much easier after that first go...I think it's just because I'd never asked my legs to do anything quite so silly before. :-)
Start on your back on a mat with your heels resting on the exercise ball, arms at your sides keeping the core tight, body in a straight line from your feet to your shoulders. You're going to need to really concentrate on relaxing your neck and shoulders in this one...not an easy thing to do. Try to rely on your core muscles for stability. The wider your arms are placed on the floor the easier it should be. Work towards getting your arms in line with your body though.

Now, draw your feet towards your bottom, keeping the same angle as when you started. Don't drop your butt. :-) Repeat.


Up-Down on Ball:

For this one, start with your feet flat on the ball and your booty up off the floor...keeping a straight line from your upper back to your knees. You're going to do quick drops of your bottom to the mat 14-16 times, keeping that ball drawn in towards your bottom the whole time. Return to the starting position after each drop.


Bench press on ball:

This is just to show you that you can do some of your upper body work on the ball too. By using the ball, you're having to work your core muscles too. Keep that booty up and legs at 90 degrees the whole time you're doing your presses. This is a bad picture, because I notice that my spine doesn't really look like it's in a neutral position. Just remember to tilt that pelvis forward and suck that belly button to your spine....can't say it enough.


Lastly, it's good to have a workout buddy.


I know this is kind of a sporadic workout...but I just wanted you to see a couple of the exercises I do that really seem to keep my back in working order. Nothing worse than a gimpy back...'cept maybe a gimpy foot Auntie J? ;-)

Big hugs to you both and I hope I can get out there really soon for in-person hugs!
xoxo,
e