Friday, March 19, 2010

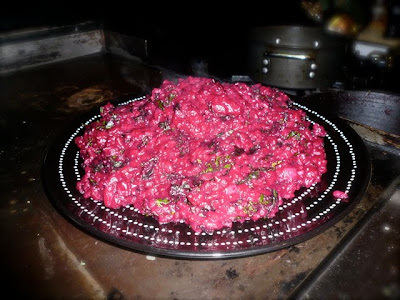
Risotto with Beets and Kale:

On a recent trip I grabbed the latest copy of Cooking Light magazine to read on the plane. What did I find inside but an article featuring the restaurant the Monster had taken me to for my birthday a few weeks prior. In the magazine, the restaurant shared a recipe for beet risotto that caught my attention. Gorgeous color and met the requirements of appearing tasty and fairly healthy.

I was lucky enough to see an old friend for the first time in about 20 years on my visit.
We got a little snap happy. :-)

She just happens to share her life with a wonderful cook (she's pretty amazing in this dept. too) AND an immense Wolf range. Long story short, after walking to Whole Foods and braving a freako hail storm (in SF?!) on the way home, we made the risotto recipe.
The only thing I'd suggest doing differently from what you'll see in the photos is to cook the risotto in a non-reactive pan. Stick with a good stainless steel pan for this one.

Tonight I plan on making a version using golden beets and barley in lieu of the red beets and arborio rice from the first round...will update with the alternative recipe if it works out!

Risotto with Beets and Kale:
(slightly adapted from Olivia restaurant's recipe)

1 pound red beets
1/4 cup red wine vinegar
1 tablespoon fresh tarragon
3 tablespoons olive oil, divided
1 teaspoon minced garlic
6 cups chopped kale (about 1 bunch)
2 cups vegetable broth, or reduced salt chicken broth
2 cups water
1/2 cup chopped onion
1 cup Arborio rice
1/4 cup white wine
1/2 tsp+ salt
Optional...not: chevre or other nice fresh goat cheese. Fyi, Humbolt Fog is awesome with it.

Preheat oven to 350°

Leave root and 1-inch stem on beets; scrub with a brush. Wrap beets in heavy-duty aluminum foil. Bake at 350° for 1 hour and 15 minutes or until tender. Remove from oven; cool. Trim off beet roots and stems; rub off skins. Cut beets into quarters. Place beets, vinegar, tarragon, and 1 tablespoon oil in a blender. Process until smooth; set aside.

Heat a large skillet over medium heat. Heat 1 Tbs oil in pan and add garlic; cook 30 seconds, stirring constantly. Add kale to pan; cook 5 minutes or until kale wilts, stirring frequently. Remove kale mixture from pan; wipe pan clean.

Bring broth and 2 cups water to a simmer in a small saucepan (do not boil). Keep warm over low heat.

Heat remaining tablespoon of oil in skillet over medium heat. Add onion; cook 5 minutes or until tender, stirring occasionally. Add rice; cook 1 minute, stirring constantly. Stir in wine; cook until the liquid is absorbed, stirring constantly.

Add broth mixture, 1/2 cup at a time, stirring constantly until each portion of broth is absorbed before adding the next, until all broth has been used. Should take around 20 minutes.

Stir in pureed beet mixture, kale, and 1/2 teaspoon salt.

Remove from pan and serve topped with a bit of nice fresh goat cheese on each plate if you know what's good fer ya.

Thursday, March 18, 2010

Roasted Cauliflower with Chickpeas and Olives

I knew this would be a winner when I came across the recipe in March's issue of Cooking Light.
All of the ingredients are things that I love. This is a great easy side dish for fish. In last night's case, wild Alaskan cod rubbed with a bit of olive oil, sprinkled with smoked sweet paprika, garlic powder, kosher salt, pepper and thinly sliced lemon, then baked at 450 for about 10 minutes.
Finish off the meal with a simple arugula salad...perfection.

Roasted Cauliflower with Chickpeas and Olives:
(Cooking Light Mar. 2010)

1 large head of cauliflower, sliced at about 1/4 inch...try to get them all about the same width
1 can of chickpeas, rinsed and drained (2nd time making this I dried the chickpeas off with paper toweling and they got nice and crispitty...awesome!)
24 Spanish olives, halved
8 cloves of garlic, coursely chopped
3 Tbs good olive oil
1/2 tsp red pepper flakes
~1/2-1 tsp kosher salt
3 Tbs chopped parsley

Preheat oven to 450.
Place all ingredients, but the parsley on a large baking sheet and toss to coat.
Roast for ~12 min. then stir.
Continue roasting for about another 12 min., then remove from oven and toss with parsley.
Serve warm.

If making fish, you can just pop the fish in the same oven after you stir the cauliflower at 12 minutes and they'll be done about the same time.

Thursday, March 4, 2010

Langues de Gene Simmons (aka. Olive Oil Crackers) 2 Ways:

Debbie and I got crazy in the kitchen with a borrowed pasta machine the other day and whipped up 2 kinds of lovely rustic crackers. Much fun! First recipe we made was found on a blog I read and uses white unbleached flour. Not my favorite thing to use in the kitchen as my tastes run more towards whole grains. That doesn't mean they weren't fantastic crackers though. We added some fresh rosemary from my garden and fresh cracked black pepper to the dough too. Fabulous.
I had to try another batch using my favorite spelt flour, so we mixed up a 1/2 batch using the spelt and a mix of seeds. Yum!
All this to say...you really need to be making your own damn crackers people! So much fun, so easy, and you'll knock your friends socks off (this has not been proven). Put whatever you'd like in them and they'll be awesome. You sure don't need a pasta machine to make them, but it was fun to use. A rolling pin would work well too I'm sure. You will however need a scale if you go by the recipe I'm posting, since all Nourish Me's instructions were in metric grams.

Rosemary and Black Pepper Olive Oil Crackers:
(base recipe from Nourish Me's blog)

250g of sifted unbleached all-purpose flour
1 tsp baking powder
1 tsp chopped fresh rosemary
1/2 tsp fresh cracked black pepper
125 ml of water
2 Tbs good olive oil + more for brushing
flaked sea salt

Sift flour and baking powder into a bowl (or the bowl of a mixer), then add rosemary and pepper.
Make a well in the center and pour in water and olive oil.
Either mix by hand or use the paddle attachment on your mixer to work to a dough.
Turn out onto a very lightly floured bench and knead until smooth.
Wrap in Saran wrap or a clean tea towel and rest in fridge for 1 hour.

Preheat oven to 425.
Dust the bench and keep flour close at hand.
Cut off or pull off walnut-sized blobs and roll them out in long, thin tongues if using a rolling pin. Or alternately, use a pasta machine going to ~5 thinness. We took them all the way to 6, but I found I liked the slightly thicker ones much better.

Arrange on a parchment lined baking sheet and brush liberally with good olive oil. Lightly sprinkle each with flaked sea salt. Less is more we found. Bake in batches for 6-8 minutes.
Look for a pale gold but no darker...Nourish Me says pale gold is good; deep gold is burnt.

Seedy Spelt Olive Oil Crackers:

250g whole spelt flour
1 tsp baking powder
2 Tbs sesame seeds (we actually used sesame Gomasio, but I'm not sure about the seaweed flavor)
2 Tbs chia seeds
2 Tbs flax seeds
1/2 tsp garlic powder
125g water (might need about 1 Tbs more)
2 Tbs olive oil

Sift spelt flour and baking powder into a bowl. Add seeds and stir.
Make a well at the center and add water and olive oil. Mix until all comes together as a dough.
You won't really have to knead this one. Just make sure there's enough water and olive oil to bring it together in a smoothish dough.
Wrap and refrigerate for 1 hour.

Preheat oven to 425.
Follow instructions for recipe above at this point...rolling out into long thin tongues of dough, brushing liberally with good olive oil, and sprinkling lightly with flaked sea salt. If using a pasta machine, you'll only be able to take these to about a 4 thinness. The seeds will get stuck and rip the dough beyond that.
Bake until lightly gold...or as near as you can tell, given it'll be a darker cracker. Make sure you're standing at the oven as they can go from perfect to burnt fairly quickly.
We ate these with curried green pea soup. 5 ingredients...you've gotta try it. Delish!

Wednesday, March 3, 2010

Sun-dried Tomato Relish over Salmon

I don't know what possessed the Monster and I to buy a humongous jar of sun-dried tomatoes at Costco, but buy it we did. Not having cooked with sun-dried tomatoes all that often, I see many an internet recipe search in my near future. But, even if I don't come across any others that strike my fancy I'd be perfectly happy making more batches of this goodness. A quick relish that comes together in no time using a food processor, this sauce would be perfect with most anything...pasta, chicken, fish, thinned out a bit with some water and added balsamic for salad dressing, or even a bruschetta topping with goat cheese (the wrap I made for lunch with 2 leftover turkey and spinach meatballs in a spelt tortilla was fantastic with the relish!).
We ate the relish on top of wild Alaskan salmon (baked at 450 for 9-10 minutes). It also tasted great on the asparagus we paired with the fish.

Sun-dried Tomato Relish:
(Kalyn's Kitchen who slightly adapted it from Fine Cooking Magazine)

1/2 cup sun-dried tomatoes packed in oil
1/4 cup drained and pitted kalamata olives
1 T chopped red onion
1 T capers
2 T chopped parsley (or more)
(original recipe had chopped oregano too)
2 1/2 T fresh lemon juice
5 T extra virgin olive oil
sea salt and fresh ground black pepper to taste

Put sun-dried tomatoes into food processor with steel blade, and process about 30 seconds. Add olives, red onion, and capers, and process about 30 seconds more. Add all remaining ingredients and process about one minute, or until ingredients are uniform size and well combined. Serve over baked/grilled fish, or whatever else suits your fancy.

Thursday, February 18, 2010

Roast Squash, Caramelized Onion and Goat Cheese Tart


I brought this to bookclub last time we met and it was well received.
Realize before making this that it will take you a bit of time, but a worthy endeavor it shall be. Make sure you read the recipe clear through so you get an idea of all the steps first.
I'm thinking that if you can plan your meals ahead and carmelize a bunch of onions a day before making this, it'd take a load off the time involved in making this the day of. Also, if you can find it (I couldn't), it'd be well worth the money spent in buying pre-cut butternut squash for this! Those can be real boogers to take down.
The crust for this would be wonderful in any number of savory dishes. Really great, not too unhealthy, and super easy/foolproof. Right up my alley, as I have NO skillz in the pastry making department.

Roast Squash, Caramelized Onion and Goat Cheese Tart:
(Amy Chaplin's fabulous blog Quinoa and Coconut)

Crust

1 cup rolled oats

1 cup whole wheat pastry flour, or whole spelt flour (I used whole spelt...delicious!)

1/2 tsp sea salt

1/2 teaspoon baking powder

5 tablespoons extra virgin olive oil, or melted butter ( I used a 50/50 combination)

2-3 tablespoons soymilk, cow's milk, or filtered water (I used unsweetened almond milk)

Filling:
2 large red onions, sliced (bi-sected top to bottom, then sliced in ~1/4" slices in the other direction...like you'd cut onion rings)

1/4 cup extra virgin olive oil, divided

sea salt

2 teaspoons balsamic vinegar

1 large butternut or red kuri squash, 2 1/2 to 3 pounds, peeled and seeded

fresh black pepper

3 or 4 sprigs of fresh thyme, leaves removed

1/4 pound fresh goat cheese

arugula to serve

Pre-heat oven to 325 degrees Fahrenheit.

Pulse oats in a food processor until coarsely ground, place in a bowl with flour, salt and baking powder, mix well. Melt butter (if using) in a small sauce pan over medium heat, add olive oil and brush a little into a 9 inch tart pan with a removable bottom, pour the rest into oat-flour mixture. Mix with a fork until all the butter and oil is combined, drizzle in milk/water and mix until pastry holds together, it shouldn’t be too wet. Press crust into tart pan and pre-bake for 20 minutes, remove from oven and set aside.

Place onions and 2 tablespoons of the olive oil into a wide skillet or frying pan and cook over medium-high heat, stirring every few minutes until they begin to brown, about 10 minutes. Lower heat to medium-low and cook until caramalized, this takes a good 30 minutes, if they begin to stick turn heat down a little. Stir in a large pinch of sea salt and the balsamic vinegar, cook another few minutes. Remove from heat and set aside. (I usually add a small touch of agave nectar when I add the balsamic, and I do add a pinch of salt when first adding the onions to the pan)

Raise oven temperature to 375 degrees.

Cut squash into 3/4 inches chunks, spread on a baking sheet lined with parchment paper, drizzle with remaining olive oil, a large pinch of sea salt and pepper, toss well. Roast for 30 to 35 minutes or until golden brown, remove from oven and set aside to cool.
In a large bowl combine caramelized onions, roasted squash and thyme leaves.
Crumble half of the goat cheese into the bowl and gently toss. Crumble remaining goat cheese over the bottom of the pre-baked tart shell, top with squash mixture and return to oven for another 20 minutes until goat cheese is golden and slightly melted. Allow to cool before serving.

Sunday, February 7, 2010

Nutella Inspiration Waffles

I discovered a wonderful blog by Amy Chaplin called Coconut and Quinoa in a search for a waffle recipe that included nut meal and cocoa. This recipe was my jumping off point. I do hope to make it as written someday, but this morning I was fulfilling a long ago made request for chocolate waffles. I've made Amy's Roasted Squash, Carmelized Onion and Goat Cheese Tart and it was to die for good. Hopefully, she'll let me repost the recipe...although truth be told, it's looking at her photos that will convince you to make it.
Ok, back to the waffles. Nutella. So good. I had hazelnut meal in the fridge that needed using up, so thought immediately of pairing it with cocoa. I've left the orange in from the original recipe for a more grown up flavor, but you could leave that out if it doesn't appeal (I SO wanted to spell that "appeel") to you. I stuck with a more neutral flavored oil instead of extra virgin olive oil, added some vanilla, and a bit of dried espresso to deepen the chocolate flavor all the more. To drive home the Nutella goodness, I mixed about 1 Tbs into some fat-free Greek yogurt to top the waffles.
True confession time now. I also mixed in homemade agave sweetened coconut cream. Decidedly not fat-free. Wow.

Nutella Inspiration Waffles:

1 Cup whole spelt flour
1/4 cup good quality unsweetened cocoa powder
1/2 tsp baking powder
1/4 tsp sea salt
3/4 cup hazelnut meal (almond meal would be great too)
2 eggs (separated)
optional: ~1 tsp orange zest
1/2 cup fresh squeezed orange juice
3/4 cup almond milk, soymilk, regular milk, etc. (I poured 1 tsp of vanilla into the measuring cup and then filled to 3/4 full with the milk)
1/4 cup canola oil, or other neutral flavored oil
1/2 tsp dried espresso powder (optional)
2+ Tbs Sucanat

Topping:
Mix together-
(~1/4 cup Coconut cream...only because I had it, but man was this good!)
Greek yogurt
~1 Tbs Nutella
Agave nectar to taste


Heat a Belgian waffle iron.

Sift spelt flour, cocoa powder, baking powder, salt into a medium sized mixing bowl. Stir in hazelnut meal and set aside.

In another bowl, whisk together, egg yolks, orange zest if using, orange juice, vanilla/milk combo, espresso powder if using, Sucanat, and oil.

Whisk the egg whites to stiff peaks in a third bowl.
Stir the milk/juice mix into the dry ingredients. Then, gently fold the egg whites into the batter.

Brush heated waffle iron with oil and go forth and waffle! Cook waffles until little to no steam is coming out...we used a large Belgian waffle iron for this. Best eaten directly off the iron, but we did keep most of them warm in a low oven. Alas, they lose their crispness doing this. Delicious all the same. Top waffle with yogurt/Nutella/agave mixture....mmmmmmmm....

Saturday, February 6, 2010

Spaghetti with Bechamel Kale Sauce and Sweet Potato Balls


I was following a recipe when I began this one, after making the sweet potato kale mash I was a little unimpressed.
Knowing it should and could be better, I postponed this dinner until the next night after feeling a bit let down by the kale sweet potato mash I'd made. The original recipe was vegan. My version is still vegetarian, but with the added ricotta, Parmesan, a bit of egg, balsamic and nutmeg the balls were really super tasty. The original recipe served the balls with a tomato based pasta sauce. Well, I went to the trouble of making a fresh tomato sauce, but it just didn't feel right.
Popped that in the freezer and decided to go with an easy bechamel instead. Tossed in a whole bunch of braised kale and it was a stellar meal.

Now when I made this, I cooked the onions and kale for the balls separately from the onions and kale that went in the sauce. No reason to do this...so if you're making the whole meal just go ahead and cook the full amount of kale and onions together, then divide between the balls and sauce.

One more quick note...
If the Monster wasn't so opposed to pecans, I'd have included some chopped toasted pecan pieces in the balls for added texture.

Sweet Potato Kale Balls:
2 medium sweet potatoes, washed well and diced (If the skin is nice, don't bother peeling them)
1 medium onion, chopped
3 cloves garlic
~6 leaves of kale, chopped into small pieces
~1 tsp+ balsamic vinegar
~1/4 cup Parmesan Reggiano crumbles (I tossed a chunk of Parm into the food processor to make small crumbles)
~1/3-1/2 a tub of part-skim ricotta cheese
I also added about 1/2 an egg...will need to make this again and will update exact amounts!
kosher salt
pepper
whole wheat bread crumbs
olive oil

Preheat oven to 400.
On a sheet pan, drizzle sweet potato pieces with some olive oil, salt and pepper. Toss to coat then roast for about 20-30 minutes, or until soft when poked with a fork. Remove from heat and set aside.

While potatoes are roasting, saute onions in about 2 tsp olive oil over medium heat. Add the onions and after about 5 minutes of cooking, reduce the heat to low. Stir about every 3 minutes until evenly browned.
Bring heat back to medium and add in minced garlic.
Cook garlic for ~1 minute, then add in kale, a pinch of red pepper flakes, and a pinch of salt. Saute until kale has cooked down a bit, then add a touch of veggie broth or water, reduce heat and cover. Cook for ~4 minutes or until kale is tender. Finish with balsamic vinegar. Remove from heat.

In a bowl, mash sweet potato pieces then add in kale and onion mixture.
Let it cool, before adding in part of an egg, ricotta, and Parm.
Add salt, pepper, and a touch of fresh ground nutmeg to taste.
Roll mixture into 1 inch balls, then roll them in bread crumbs.
Place on and olive oiled baking sheet (I spritzed the balls with a bit of canola cooking spray on tops) and bake for 25-30 minutes, flipping them over after 15 minutes.
Let cool a bit, then serve.

Spaghetti with Kale and Bechamel:
Brown rice spaghetti or whatever spaghetti you like (Tinkyada makes excellent brown rice noods)
1 bunch of kale; destemmed, chopped small
~1/2 med. onion, chopped
red pepper flakes
salt/pepper
1 1/4 cup unsweetened almond milk (or any other milk you'd like to use)
2 Tbs butter
2 Tbs whole spelt flour (or other flour you'd like to use)
garlic powder
fresh ground nutmeg
salt/pepper
~2 Tbs grated Parm if you'd like

Cook spaghetti...and while it's boilling:

Heat ~1 Tbs olive oil a large skillet or Dutch oven over med-high heat.
Saute onion for about 5 minutes.
Add kale, a pinch of salt and toss to coat, cook down for about 1-2 minutes.
Add ~1/3 cup veggie broth, cover and reduce heat to low.
Braise for ~7+ minutes, or until tender.
Add a touch of balsamic and anything else you feel it needs...more salt, some pepper (black and or red pepper flakes).
Remove from heat and set aside.

Heat milk in a glass measuring cup in microwave until steaming, but not boiling (take care not to scald it.
In a sauce pan, heat butter til foamy over med. heat.
Add flour and stir, cooking for several minutes.
Slowly add in heated milk, whisking all the while.
Cook over med. low heat until thickened.
Add in spices to your taste. Stir in Parm if using.
Stir in kale and onion mixture and cooked spaghetti noodles, tossing to coat.

If you've made the sweet potato kale balls too, serve with them on top of the sketti.
Wow...kind of seemed like a lot of work, but it was worth it! I'm sure this will go faster the next time. Now that I know what I'm doing! :-)